{
  "name": "acheronfail",
  "what": "Software Engineer",
  "email": "[email protected]",
  "social": {
    "gitlab": "https://gitlab.com/acheronfail",
    "github": "https://github.com/acheronfail"
  },
  "links": [
    "my latest post",
    "internet stuff",
    "Float View",
    "Chords",
    "code puzzles",
  ]
}
Last updated: Wednesday, May 28, 2025 at 19:52
About
G’day!
I see you’ve found your way over to my website.
Well, now that you’re here, let me share some things with you that I’ve found interesting, intriguing or just plain incredible.
In no particular order:
Incredible tools
Rust - it’s great
- https://github.com/phil-opp/blog_os
- https://jade.fyi/blog/pwintln-uwu
- https://fasterthanli.me/series/reading-files-the-hard-way
- https://fasterthanli.me/series/making-our-own-ping
- https://fasterthanli.me/series/making-our-own-executable-packer
- https://bheisler.github.io/post/writing-raytracer-in-rust-part-1/
- http://cliffle.com/p/dangerust/
- https://www.nickwilcox.com/blog/arm_vs_x86_memory_model/
- http://system.joekain.com/debugger/
- https://dev.to/mindflavor/lets-build-zork-using-rust-1opm
- http://jakegoulding.com/rust-ffi-omnibus/slice_arguments/
- https://hermanradtke.com/tags/rustlang/
Test your knowledge
- https://alf.nu/ReturnTrue
- https://alf.nu/alert1
- https://github.com/cure53/XSSChallengeWiki/wiki
- https://codegolf.stackexchange.com/
- https://www.joshuawise.com/c-brainteasers
- https://codesignal.com/
The internet is the best
- https://jasoneckert.github.io/myblog/the-galaga-no-fire-cheat-mystery/
- https://www.cs.unm.edu/~dlchao/flake/doom/chi/chi.html
- https://leftoversalad.com/c/015_programmingpeople/
- http://joshworth.com/dev/pixelspace/pixelspace_solarsystem.html
- https://int10h.org/oldschool-pc-fonts/fontlist/
- https://8325.org/haiku/
- https://datatracker.ietf.org/doc/html/rfc2549
- https://web.archive.org/web/20201224091302/https://kernelmag.dailydot.com/issue-sections/features-issue-sections/12228/mac-plus-modern-web/
- https://jroweboy.github.io/c/asm/2015/01/26/when-is-main-not-a-function.html
- https://nee.lv/2021/02/28/How-I-cut-GTA-Online-loading-times-by-70/
- https://www.muppetlabs.com/~breadbox/software/tiny/teensy.html
Informative
- https://marijnhaverbeke.nl/blog/
- https://www.bamsoftware.com/hacks/zipbomb/
- http://www.welchlabs.com/imaginarynumbersbook
- (accompanying YouTube series) https://www.youtube.com/watch?v=T647CGsuOVU&list=PLiaHhY2iBX9g6KIvZ_703G3KJXapKkNaF&index=1
- https://javascript.info/event-loop#macrotasks-and-microtasks
- http://journal.stuffwithstuff.com/2015/02/01/what-color-is-your-function/
- https://blog.codinghorror.com/the-best-code-is-no-code-at-all/
- https://utcc.utoronto.ca/~cks/space/blog/unix/TheLegendOfSync
- http://www.linusakesson.net/programming/tty/
- http://3zanders.co.uk/2017/10/13/writing-a-bootloader/
- https://research.swtch.com/zip
Papers / Exploits
- https://users.ece.cmu.edu/~ganger/712.fall02/papers/p761-thompson.pdf
- https://people.debian.org/~adamm/doc/usd/30.rogue/paper.pdf
- https://arxiv.org/pdf/1502.07373v2.pdf
- https://spcl.inf.ethz.ch/Publications/.pdf/atomic-bench.pdf
- https://tiszka.com/blog/CVE_2021_21225_exploit.html
- https://abiondo.me/2019/01/02/exploiting-math-expm1-v8/
- http://newosxbook.com/tools/ojtool.html
- http://newosxbook.com/articles/CasaDePPL.html
- https://saaramar.github.io/IOMobileFrameBuffer_LPE_POC/
Hehehe
- https://github.com/gco/xee/blob/4fa3a6d609dd72b8493e52a68f316f7a02903276/XeePhotoshopLoader.m (lines 108-136)
- https://wiki.installgentoo.com/index.php/Interjection
- http://fileformats.archiveteam.org/wiki/IWork
Well, if you’re still perusing, here’s some projects I’ve enjoyed doing:
- https://github.com/acheronfail/repgrep
- https://github.com/acheronfail/pixel-picker
- https://github.com/acheronfail/apptivator
- https://github.com/acheronfail/gash
- https://github.com/acheronfail/timeRS
- https://github.com/acheronfail/morrsse
- https://github.com/acheronfail/ftrace
- https://github.com/acheronfail/rotp
Last updated: Tuesday, April 30, 2024 at 07:05
Nuggets
This is just a few “nuggets of wisdom” I’ve come across. Useful to me, maybe not to you.
Either way, I wanted to write these down somewhere, but didn’t have the time to fully flesh out the ideas.
Self-improvement
Good judgement comes from experience.
Experience comes from bad judgement.
If you don’t fail, you fail to succeed.
The world is what you make it.
And it all starts, with what you make of yourself.
Act, don’t react.
The embarrassed person cannot learn.
Reaching out
The world is full of lonely people afraid to make the first move.
Working together
If you want to go fast, go alone.
If you want to go far, go together.
Code is how you treat your co-workers.
Mentoring
First, teach someone the steps.
Next, teach them to see the patterns in it.
Finally, teach them to look for outcomes, using the patterns they know.
Anyone can learn anything;
Some of us just need more time than others do.
Other
Laziness isn’t about inaction, it’s about optimal action.
Last updated: Monday, February 19, 2024 at 20:17
All posts by tag
arch
firefox
games
humans
linux
- 1996 Quake in 2021
- Diablo II Resurrected on Linux
- Measuring Max RSS
- Picking pixels on X11
- Unraid - auto-start encrypted array
- Unraid - change encryption key
macos
- 1996 Quake in 2021
- AdHoc Wi-Fi LAN networks on macOS
- Arch in macOS VM
- Network change events on macOS
- Picking pixels on macOS
network
openwrt
python
steamdeck
unraid
win10
x11
Change encryption key on an already encrypted unraid server
I recently wanted to change the encryption keys for the disks in an unraid server. This was for unraid version 6.12.9, so if you’re on an earlier or later version, things might be different.
Choose passphrase or keyfile
Things will differ depending on if you want to use a keyfile or a passphrase. A passphrase is using a password - you’d type this in when you start the unraid server; whereas a keyfile is a file you would use instead of a password, usually by choosing it in a file picker in the unraid web ui.
The process we’ll go through is adding a new key to use to unlock the disks, testing that it works, and then removing the old key.
At no point will we change the key in-place - that’s too risky: if you get it wrong, your data is gone.
Adding a new key
You’ll need to do this for each of the disks in your array. You must use the /dev/mdXp1 file, and not the /dev/sdX file for the disks in the array.
The parity disk is not an encrypted disk, so nothing needs to be done for that.
For example, if you have 4 disks in your array, and you want to add a new passphrase key:
cryptsetup luksAddKey /dev/md1p1
cryptsetup luksAddKey /dev/md2p1
cryptsetup luksAddKey /dev/md3p1
cryptsetup luksAddKey /dev/md4p1

# if you have encrypted cache disks, use their `/dev/sdX1` paths:
cryptsetup luksAddKey /dev/sdX1
Or, if you want use a keyfile instead:
cryptsetup luksAddKey /dev/md1p1 path/to/new/keyfile
cryptsetup luksAddKey /dev/md2p1 path/to/new/keyfile
cryptsetup luksAddKey /dev/md3p1 path/to/new/keyfile
cryptsetup luksAddKey /dev/md4p1 path/to/new/keyfile

# if you have encrypted cache disks, use their `/dev/sdX1` paths:
cryptsetup luksAddKey /dev/sdX1 path/to/new/keyfile
If you’re using a keyfile, make sure you have a backup of it somewhere safe. If you lose it, you won’t be able to unlock your disks.
Also, think about how you’re storing it - if you just store it directly on the unraid USB stick, you’re effectively not using encryption at all.
Testing the new key
Now’s the time to reboot your array.
When it starts back up, try using your new passphrase or keyfile to unlock it.
If the new key you’re adding doesn’t work, and you proceed onwards and remove your old key, you’ll have lost access to all your data.
Ensure using the new key works and unlocks all your encrypted disks before proceeding to remove the old key.
If it worked, let’s move on to removing the old key.
Removing the old key
This is similar to adding a new key. When you remove it cryptsetup will prompt you on which key to remove. It should go without saying: remove the old one.
cryptsetup luksRemoveKey /dev/md1p1
cryptsetup luksRemoveKey /dev/md2p1
cryptsetup luksRemoveKey /dev/md3p1
cryptsetup luksRemoveKey /dev/md4p1

# if you have encrypted cache disks, use their `/dev/sdX1` paths:
cryptsetup luksRemoveKey /dev/sdX1
Reboot again, and you’re done.
Auto-start an encrypted unraid server
This was using unraid 6.12.9, if your version is earlier or later things may be slightly different.
This guide also assumes you have an already encrypted array, and that you unlock it with a keyfile. If you use a passphrase the process should be similar.
Setting up unraid to auto-start
In the unraid web ui, navigate to Settings -> Disk Settings and set Enable auto start to Yes.
Hit Apply.
Setting up unraid to fetch the keyfile
We can leverage some events from unraid to automatically fetch the keyfile from a secure location (such as another server), and then delete it after the array has started.
Create a script to fetch the keyfile
I’ve chosen /boot/custom/bin/fetch_key as the location for this script. You can choose any location you like, as long as it’s on the /boot drive!
#!/bin/bash

# securely copy the keyfile from another server, in this example we simply
# cat the file over an SSH connection - but your needs could be different
ssh my_secure_server cat /path/to/unraid/keyfile > /root/keyfile
As long as your keyfile ends up in /root/keyfile you should be good to go.
Create a script to delete the keyfile
Now, we’ll create a script that runs and automatically deletes /root/keyfile after it’s been used. We don’t need that hanging around in RAM.
#!/bin/bash

rm -f /root/keyfile
Update unraid to run the scripts
If you didn’t know, when your unraid server starts it executes the file /boot/config/go. This is a good place to setup our scripts.
Add the following to /boot/config/go:
#!/bin/bash

# Prepare events for auto-starting the array
# NOTE: this must be done before starting `emhttp`!
install -D /boot/custom/bin/fetch_key  /usr/local/emhttp/webGui/event/starting/fetch_key
install -D /boot/custom/bin/delete_key /usr/local/emhttp/webGui/event/started/delete_key
install -D /boot/custom/bin/fetch_key  /usr/local/emhttp/webGui/event/stopped/fetch_key
chmod a+x /usr/local/emhttp/webGui/event/starting/fetch_key
chmod a+x /usr/local/emhttp/webGui/event/started/delete_key
chmod a+x /usr/local/emhttp/webGui/event/stopped/fetch_key

# Start the Management Utility
/usr/local/sbin/emhttp &
With this setup, your boot process looks like this:
- Server boots up
- Unraid runs
/boot/config/go /boot/config/gocopies over scripts to the right places- When Unraid starts the array,
fetch_keyruns and copies the keyfile to/root/keyfile - After Unraid has started the array,
delete_keyruns and removes/root/keyfile
Final thoughts
As always, your security is only as good as your weakest point. If you’re copying your keyfile from somewhere that’s not secure, or if the connection you’re using to copy it isn’t secure, then there are holes in your security.
Think carefully about how you want to secure things, and also the value you get in your encrypted setup, etc.
Last updated: Wednesday, April 2, 2025 at 14:01
How to synchronously block NodeJS
Ever wanted to sleep in NodeJS?
If so, you’ve probably seen something like this:
import { promisify } from 'node:util';

const asyncSleep = promisify(setTimeout);

// sleep for 500 ms
await asyncSleep(500);
But, has that not been enough? Have you wanted to sleep synchronously, rather than asynchronously? Ever wanted to just pause the NodeJS thread for a given amount of time?
Preferably without busy waiting like while (Date.now() < someLimit) {}?
Well, want no further! I have the solution for you!
function sleep(milliseconds) {
  Atomics.wait(new Int32Array(new SharedArrayBuffer(4)), 0, 0, milliseconds);
}

// sleep for 500 ms
sleep(500);
Yes, that’s right. Now you can use sleep whevever you want in NodeJS!
AdHoc Wi-Fi LAN networks on macOS
I recently wanted to host a game of Quake 3 Arena at work. This is a summary of how I got it working on the macOS machines we were using.
How to create an AdHoc Wi-Fi network
This requires a few buttons in the System Settings app, as well as a couple terminal commands.
Step 1: create the ad-hoc network service
You can’t create the ad-hoc in the macOS GUI on Sonoma (on previous versions this was available). To create one via the terminal, run:
# create the network service
sudo networksetup -createnetworkservice AdHoc lo0
Step 2: create the Wi-Fi service
Now it’s time to create your wireless network.
To do this, open System Settings and navigate to:
- General
- Sharing
- Internet Sharing (click the
iicon)
- Internet Sharing (click the
- Sharing
 General -> Sharing
Next, select the network you created (it’s called AdHoc) in the Share your connection from select box.
Then, enable the Wi-Fi toggle in the To devices using and a configuration dialog will appear where you can define your wireless network’s settings.
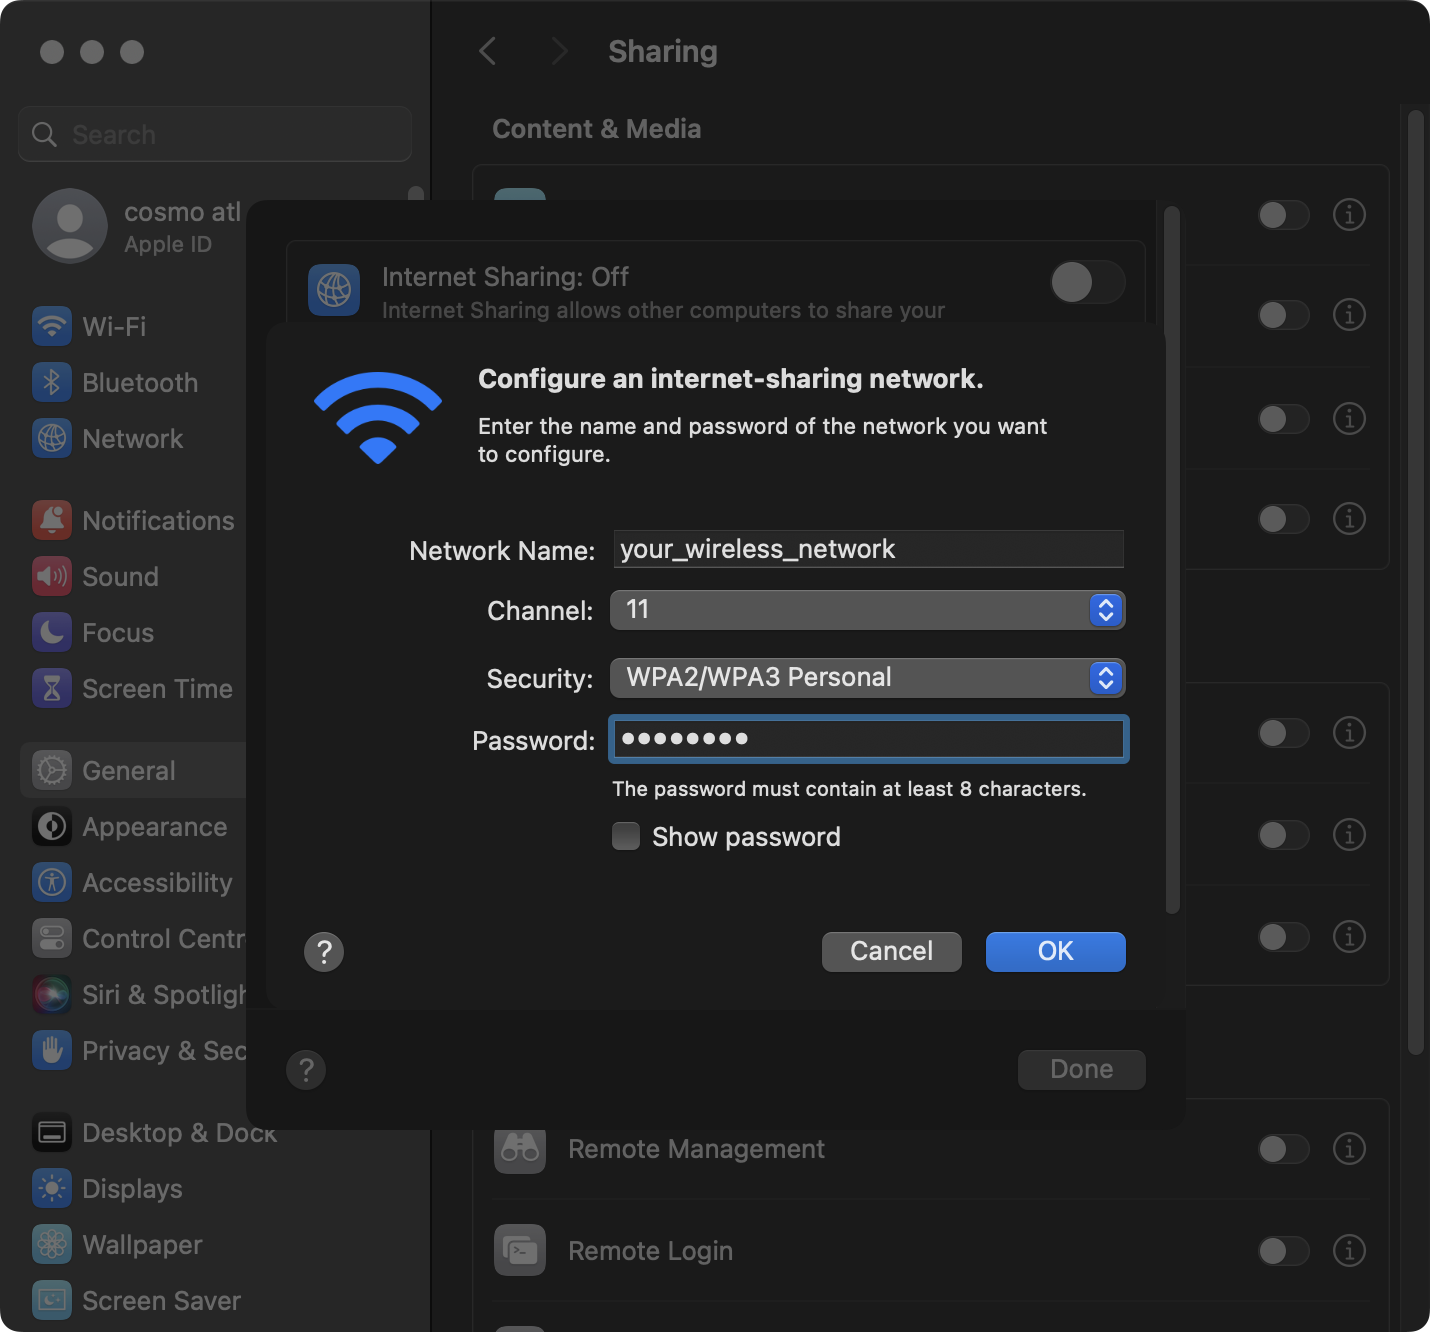 Configure your Wireless Network
You’re not done yet! Make sure you enable the Internet Sharing: On toggle at the top of the dialog and click done. Also make sure the toggle is on in the previous view.
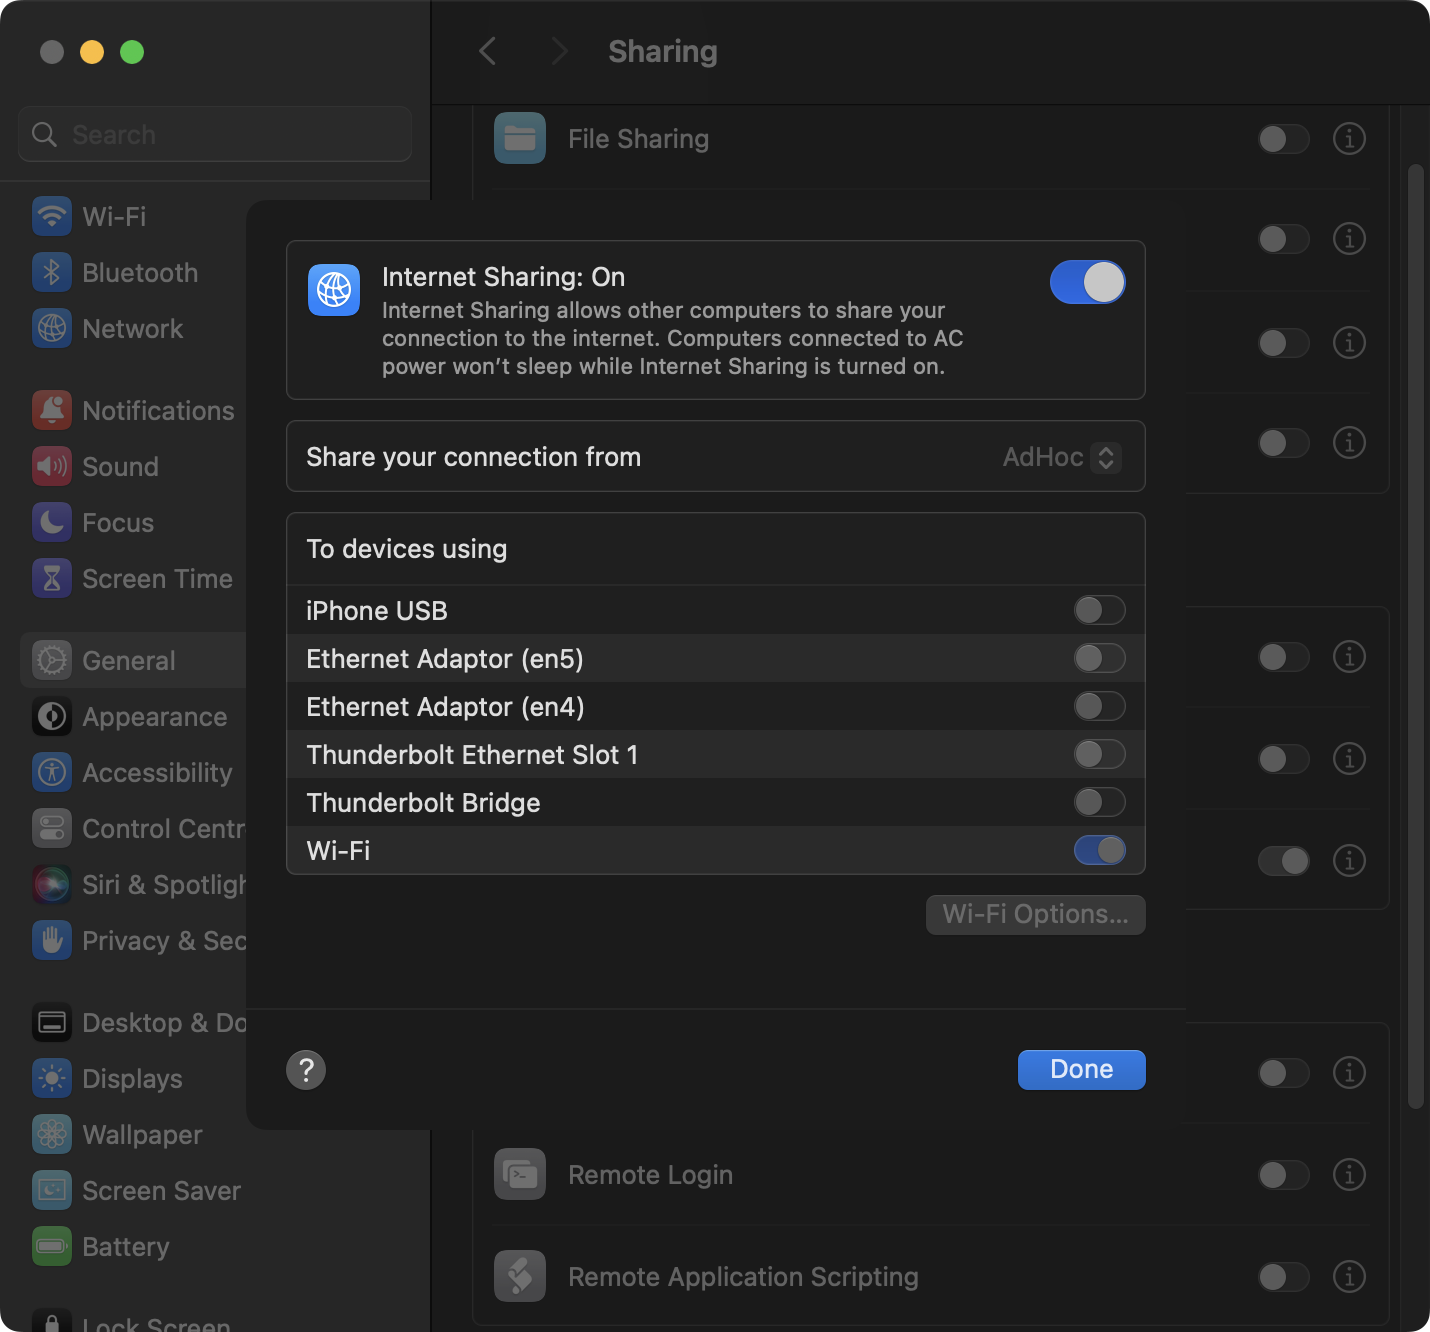 Internet Sharing Settings
The wireless network should now be created and running!
Other tips
You can enable/disable the wireless network with:
# disable the network service...
sudo networksetup -setnetworkserviceenabled AdHoc off
# enable the network service...
sudo networksetup -setnetworkserviceenabled AdHoc on
Last updated: Tuesday, July 23, 2024 at 09:40
Race threads in Python without asyncio
While writing a small python script, I faced a challenge where I needed to:
- Respond based on user input; or
- Act on notifications from a subprocess
Both of these functions were blocking - meaning they halt the program’s execution until completion - and I wanted to act on whichever returned first. I didn’t want to setup an async runtime with asyncio and all that boilerplate.
So then, how could I run two blocking calls simultaneously?
Some setup
First, let’s define two functions as examples. I’ve greatly simplified these programs for the sake of simplicity:
# simply wait for a line to be entered on STDIN:
def wait_for_input():
  print("Press Enter to continue: ", end='', flush=True)
  sys.stdin.readline()

# spawn a program, and wait for it to emit a line of output:
def wait_for_program():
  program = subprocess.Popen(["bash", "-c", "sleep 3; echo 'Hi!'"], stdout=PIPE)
  program.stdout.readline()
As you can see, both of them are blocking, so execution will halt until the .readline() calls complete. Now, I’m sure there’s a way to handle this gracefully with asyncio runtimes and such, but I didn’t want to set all that up in this simple script.
Threads to the res-Queue
With the builtin threading and the queue modules, I found - what I thought - was quite an elegant solution.
So, it turned out that Python’s Queue has a get() method which blocks until an item is returned. And we can share it safely between threads!
First, let’s update our wait_for_input and wait_for_program functions above to take a Queue and put an item in it:
# simply wait for a line to be entered on STDIN:
def wait_for_input(result):
  print("Press Enter to continue: ", end='', flush=True)
  sys.stdin.readline()
  result.put("input")

# spawn a program, and wiat for it to emit a line of output:
def wait_for_program(result):
  program = subprocess.Popen(["bash", "-c", "sleep 3; echo 'Hi!'"], stdout=PIPE)
  program.stdout.readline()
  result.put("timeout")
And then we simply create the Queue and race the functions in threads:
# we only care who returns first, so a queue size of 1 is fine for this case:
result = Queue(1)

# spawn both functions in background threads:
Thread(target=wait_for_input,   daemon=True, args=[result]).start()
Thread(target=wait_for_program, daemon=True, args=[result]).start()

# block and see who finishes first:
who_won = result.get()
print(who_won) # either "input" or "timeout" depending on which finished first
As you can see there’s not much code to this, and it can work for more advanced use-cases, too. Again, I’m sure there are some gems in asyncio, but for simple Python programs and scripts, I’ll be reaching for this instead.
You can see a small example script here if you’re interested.
Last updated: Monday, February 19, 2024 at 23:44
Building Firefox in 2024
I wanted to build Firefox from source this week, and thought I’d write about it since there were a few things that were non-obvious to me.
Getting the source
Follow Mozilla’s documentation for your platform on this. You’ll need mercurial and python3 at least.
Just make sure when you bootstrap the code, you bootstrap it to use git - their documentation describes how, it’s something like:
$ python3 bootstrap.py --vcs=git
Firefox is migrating to git, so it’s likely that these instructions will be out of date by the time you read this. More on that here:
Building Firefox
There are some tips on building firefox in slightly different ways, such as downloading pre-built artifacts, etc. I did try those at first, but then I found that hardware acceleration didn’t work, so I ended up removing all those options and building normally instead.
Firefox has a pretty easy build system, just run ./mach build and off it goes.
Configure your build with mozconfig
You’re building firefox from source, so I presume you want to customise it. Well, you do that with a file called mozconfig. Just whack that in your mozilla-unified repository, and any options set in there will be read when you ./mach build.
You can list most of the options with:
$ ./mach configure -- --help
Some options I recommend for building a release copy of firefox:
# Enable Profile Guided Optimisation. Basically, after building firefox, it runs
# firefox with a suite of tests, profiles it, and then re-compiles with that
# added information.
# https://firefox-source-docs.mozilla.org/build/buildsystem/pgo.html
ac_add_options MOZ_PGO=1

# Always bootstrap toolchain, so we don't depend on the host's toolchain.
# This makes the build download the toolchain and uses that instead, which makes
# things a whole lot simpler.
ac_add_options --enable-bootstrap
If you want to do a debug build instead of a release build, then add ac_add_options --enable-debug.
How to build a different version of Firefox
If you’ve just checked everything out, then you should be on the bookmarks/central branch. If you build now, you’ll get the latest Firefox Nightly. But, what if you want to build the latest release? What about the Beta? Or the latest Extended Support Release?
This was non-obvious to me at the beginning, but if you are using git just list the remote branches:
# list remote branches
$ git branch -r
origin/HEAD -> origin/branches/default/tip
origin/bookmarks/aurora
origin/bookmarks/autoland
origin/bookmarks/beta
origin/bookmarks/central
origin/bookmarks/fx-team
origin/bookmarks/inbound
origin/bookmarks/release
origin/bookmarks/esr115
...
And checkout the particular branch you want to build.
Keep in mind that branches have different build configurations. For example, the bookmarks/release branch doesn’t automatically include --enable-bootstrap like the bookmarks/central branch does.
I recommend just keeping --enable-bootstrap in there since it means you don’t need to make any changes to your machine’s build system.
Where to ask for help
The firefox maintainers are extremely helpful, and should you have any questions at all I wouldn’t hesitate to ask. If it’s related to building firefox itself, I found asking questions in the #developers channel worked very well.
Huge thanks for everyone working on firefox - it’s a great piece of technology, and surprisingly easy to get setup and build things locally for a project of its age.
Last updated: Tuesday, February 13, 2024 at 20:41
Network change events on macOS
I don’t like polling.
I feel we live in a modern world, and there’s 100% no need for any systems to need to poll another system in order to know its state. There should be some kind of event, or a push-based model, rather than having to waste resources polling.
All that said, this is a short article on how to be notified about network change events on a macOS machine.
The goal
I had a simple task - run a command when one of a network interface is disconnected on a macOS machine.
On Linux, this task is trivial. There’s the netlink API, and if you don’t want to integrate with that, there’s even the nl-monitor command which can give you the same information. There’s a myriad of tools based on netlink, too; so you’re spoiled for choice.
On macOS it’s a different story.
Let’s search the web
After a decent amount of time looking around, I could only find solutions to detecting network changes that included periodically parsing ifconfig in a loop, watching specific directories for changes then parsing networksetup or silly things like “when you want to know if the network changed, just open System Preferences and look in the Network tab”.
I was honestly shocked to read all these answers, and not have found something or someone that had publicly shared a solution to this.
With my short investigation not bringing much up at all, I decided to go hunting in Apple’s developer documentation.
Looking around Apple’s documentation
A nice surprise, is that Apple has tagged their documentation quite well. I was able to select a Networking tag which returned a few sections. After looking through them, there was an aptly named Network section.
After looking through the various APIs there, I found NWPathMonitor.
The Solution
To Apple’s credit, this was an extremely simple API to consume. And they’ve done quite a good job on making Swift approachable. Within minutes I had this simple program:
/**
 * A small program which watches for network changes on macOS without using a
 * polling system.
 *
 * Compile this with: `swiftc ./net-monitor.swift`
 */

import Network

let monitor = NWPathMonitor()
monitor.pathUpdateHandler = { path in
  // inspect the `path` variable here for more information
  print("\(path)")
}

monitor.start(queue: DispatchQueue(label: "net-monitor"))
dispatchMain()
Now, compiling and running that script provides me with a line of output each time a network change is detected:
$ swift ./net-monitor.swift
$ ./net-monitor
satisfied (Path is satisfied), interface: en0[802.11], ipv4, ipv6, dns, uses wifi
satisfied (Path is satisfied), interface: en1, ipv4, ipv6, dns
# and so on...
This happens for WiFi adapters, ethernet adapters, VPN interfaces, etc. So it’s perfect for what I wanted.
I also wanted the output to be line buffered, so I could easily consume network changes in a shell pipeline. All I had to do was manually write to standard out. Wasn’t that hard:
// Remember to `import Foundation` to use this:
FileHandle.standardOutput.write("\(path)\n".data(using: .utf8)!)
Last updated: Sunday, February 11, 2024 at 14:28
Measuring Max Resident Set Size
Did you know that the ru_maxrss field (Maximum Resident Set Size) isn’t always accurate?
Well, I didn’t either, until I wanted to get a rough memory usage benchmark across a few different programs, and noticed that it wasn’t quite right.
Using wait4
My first attempt at measuring the max RSS was using wait4. Looking at its man page with man wait4, we see the following signature:
pid_t wait4(pid_t pid, int *stat_loc, int options, struct rusage *rusage);
I whipped up a small program to use that, and called it timeRS (because it’s basically the time command, but in Rust).
Using this program, we can measure what the rusage.ru_maxrss field is for a any command.
rusage.ru_maxrss is inaccurate
As far as I was concerned, the max RSS reported here was just fine. That was, until I noticed some odd behaviour, especially when running commands which used very little memory.
I have a toy project which pits different programming languages against each other, and I started seeing these results when using rusage.ru_maxrss:
| Language | Max Resident Set Size |
|---|---|
assembly | 262.1440000 kB |
zig | 262.1440000 kB |
pascal | 393.2160000 kB |
c-clang | 1.4417920 MB |
c-gcc | 1.4417920 MB |
nim | 1.4417920 MB |
rust | 1.8350080 MB |
fortran | 2.6214400 MB |
lua | 2.6214400 MB |
forth | 3.1457280 MB |
go | 3.2931840 MB |
cpp-clang | 3.4078720 MB |
cpp-gcc | 3.4078720 MB |
haskell | 4.1943040 MB |
perl | 4.8496640 MB |
I mean, what are the chances that languages have the exact same max RSS value??. I was okay when it was c-clang and c-gcc, because maybe - just maybe - they had the same optimisations and both compiled into a program that’s essentially exactly the same.
But assembly and zig? And what about fortran (compiled) and lua (interpreted)? Surely not!
And thus started the investigation. After some searching, I found others who had noticed issues with using rusage.ru_maxrss, too:
- https://jkz.wtf/random-linux-oddity-1-ru_maxrss
- https://tbrindus.ca/sometimes-the-kernel-lies-about-process-memory-usage/
- https://github.com/ziglang/gotta-go-fast/issues/23
- https://github.com/golang/go/issues/32054
If you read those, you’ll find that there’s a this section in the Linux man pages:
Well, that’s going to definitely play a part in why I’m seeing the behaviour I’m seeing.
But that’s not all! Upon further inspection, I also discovered this:
Resident Set Size: number of pages the process has in real memory. This is just the pages which count toward text, data, or stack space. This does not include pages which have not been demand-loaded in, or which are swapped out. This value is inaccurate; see
/proc/pid/statmbelow.…
Some of these values are inaccurate because of a kernel-internal scalability optimization. If accurate values are required, use
/proc/pid/smapsor/proc/pid/smaps_rollupinstead, which are much slower but provide accurate, detailed information.
Ahh, there we go. So we’ve found the reason we’re not getting good numbers from rusage.ru_maxrss, and we also potentially we have a workaround by reading /proc/$PID/smaps and its ilk.
Reading /proc/$PID/smaps
There’s an inherit problem with reading /proc/$PID/smaps: when do we read it? What if the process only runs for an extremely short amount of time?
Really, we need to read this at the end of the process’ life, right before it exits. Otherwise we might miss memory that would be allocated after we read /proc/$PID/smaps.
gdb to the rescue!
Let’s use gdb to run the program, set a breakpoint just before it exits to pause it, and at that point we can read from /proc/$PID/smaps.
First, let’s create a script to make running gdb a little easier:
# set breakpoint 1 before the program exits
catch syscall exit exit_group

# add condition to breakpoint 1, to only catch the main thread's exit
# this avoids any spawned threads from triggering the breakpoint
python
gdb.execute("condition 1 $_thread == 1")

# run the program until it stops on the above breakpoing
run

# the program has stopped on the exit breakpoing, capture its pid
python
gdb.execute("set $pid = " + str(gdb.selected_inferior().pid))
end

# now read from `/proc/$PID/smaps`
eval "shell cat /proc/%d/smaps_rollup > rss.txt", $pid

# let the program exit
continue
# quit gdb
quit
Awesome! For simple single-threaded programs, this seemed to work well.
However, I noticed that if a program created threads or spawned child processes, then the RSS values were far smaller than expected. Unfortunately, this only tracks the RSS value of the main thread, not all threads/processes that the program launched.
In summary:
- Works for single-threaded programs
- Does not return an accurate RSS for multi-threaded programs or programs that spawn other processes
gdbseems to often get stuck with some programs- for some reason some processes exit even after hitting the breakpoint, so by the time we read from
/procit’s no longer there - this seemed to only happen for more complex programs - again for reasons I don’t know, this didn’t work for Erlang programs (the breakpoint wouldn’t trigger)
- for some reason some processes exit even after hitting the breakpoint, so by the time we read from
It was already getting frustrating trying to script gdb to do what I wanted. And at this point, what I wanted was this:
- Run
program - Stop program moments before it exits
- Read
/proc/$PID/smapsand get its RSS - Do this for every thread/process that
programspawns during its lifetime
So, rather than continue to bend gdb to my will, I thought I’d use the same APIs that gdb itself uses to debug programs.
Enter ptrace
If you’re unaware, PTRACE is the Linux API that powers debuggers. It’s what gdb itself uses, and it’s actually quite easy to use!
There’s a little setup required, but man 2 ptrace is an absolutely excellent (required, I’d say) resource to refer to when using it. In essence, it boils down to something like this:
- Your program
forks - The newly spawned child issues a
PTRACE_TRACEMEand thenSIGSTOPs itself - The parent then calls
waitpidon the child - The parent then controls the child via PTRACE APIs, etc
With this approach, it’s quite easy to halt the traced process just before it exits, and also to automatically begin tracing all of the process’ children whenever they’re created.
So, I built a tool using Rust that makes use of the PTRACE API and does exactly what I want. I present to you, max_rss.
Who saves the day? max_rss does
Here’s an updated table of the max RSS tests, now using max_rss:
| Language | Max Resident Set Size |
|---|---|
assembly | 12.2880000 kB |
zig | 192.5120000 kB |
pascal | 528.3840000 kB |
c-clang | 1.4868480 MB |
nim | 1.5319040 MB |
vala | 1.5523840 MB |
c-gcc | 1.6138240 MB |
rust | 2.0193280 MB |
fortran | 2.4330240 MB |
lua | 2.6705920 MB |
pony | 2.6910720 MB |
forth | 3.2604160 MB |
cpp-gcc | 3.6864000 MB |
cpp-clang | 3.7068800 MB |
That looks MUCH better! No processes suspiciously have the exact same values, and it tracks forks/execs/clones/etc and captures all of their RSS values, too.
Rust makes it very simple too, using PTRACE, argument parsing, error checking and a load of comments in the code, it only clocks in at ~300 LOC.
See also
Some pages I found while investigating this, that you may also find interesting:
- https://jkz.wtf/random-linux-oddity-1-ru_maxrss
- https://tbrindus.ca/sometimes-the-kernel-lies-about-process-memory-usage/
- Debugger deep-dive mini series
- https://www.kernel.org/doc/html/latest/filesystems/proc.html
Last updated: Sunday, February 11, 2024 at 14:28
Creating an Arch Linux VM on an ARM MacBook
This isn’t a complete step-by-step guide to installing Arch Linux in a VM on an ARM Mac, but it should have enough information for you to figure the rest out yourself, and save you some time figuring out how to do things.
- Creating an Arch Linux VM on an ARM MacBook
- Create the VM
- Potentially useful links
Here’s a brief overview of things I tried, with some of the drawbacks:
| backend | OpenGL | input capture support | x86_64 support | USB Passthrough |
|---|---|---|---|---|
virtualise (qemu) | low version, some apps didn’t work | mouse and keyboard | none | full support* |
virtualize (apple) | best | only keyboard | via rosetta | no support |
emulate (qemu) | low version, some apps didn’t work | mouse and keyboard | full (slow) | full support* |
*: There’s currently a bug with UTM where it can’t pass through m.2 drives, everything else I tried seems to work though.
I couldn’t get a LUKS decryption prompt working at all with the
virtualize (apple)backend. I’ll have to have a deeper look into that at a later date…
Because of the above, I opted to use the virtualize (apple) backend so programs using OpenGL would work, and also so I could have x86_64 emulation support in the VM.
Create the VM
Step 1: Requirements
- UTM: https://mac.getutm.app/
- This is the application that configures and runs the VM on the macOS host
- ArchBoot: https://archboot.com/#iso
- This is used as the boot environment to install Arch in the VM
- I used the latest version of the
aarch64iso image, you can find it here
Step 2: Create the VM in UTM
Create a new VM, and select Virtualize. This is for the best performance, since it doesn’t emulate a different CPU architecture.
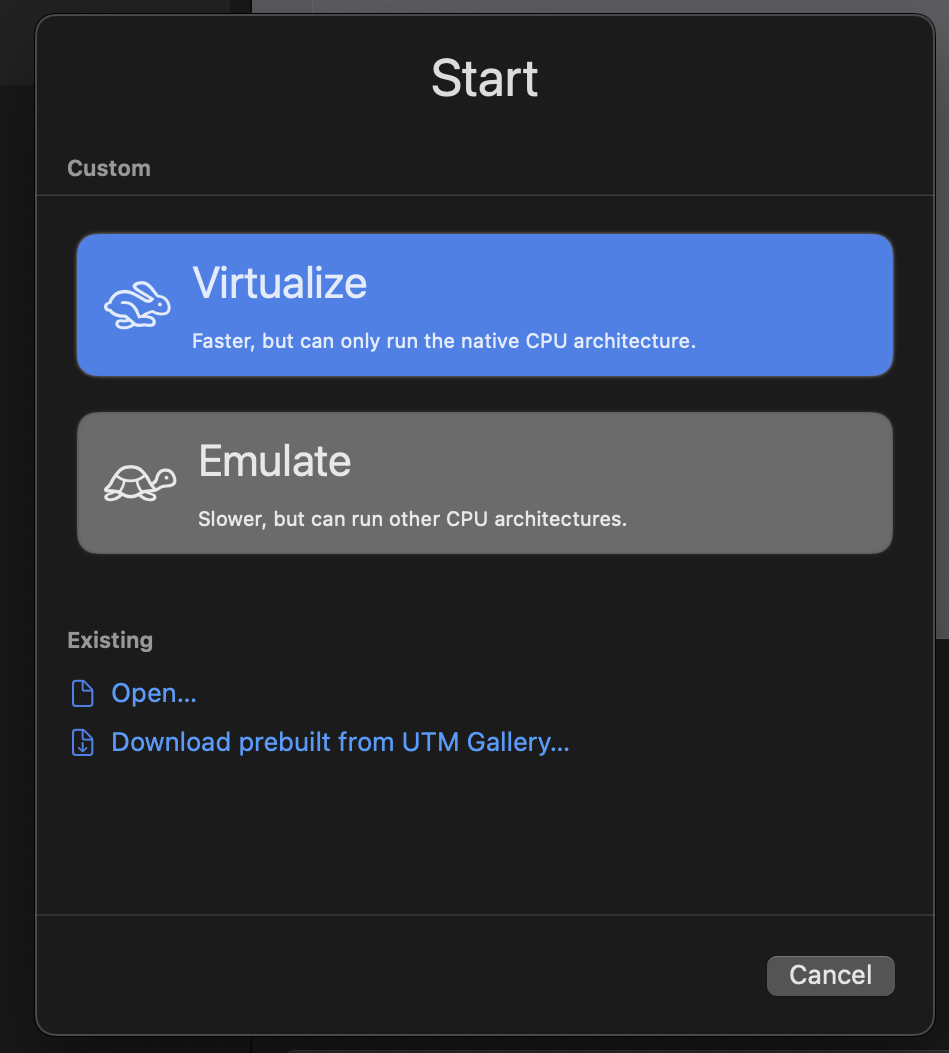 select virtualise when creating vm
Select Linux.
Now, make sure to check Use Apple Virtualizaton and also Enable Rosetta (x86_64 Emulation). (See the table at the top of this page as to why I chose to use Apple Virtualization instead of QEMU.)
Finally, select the archboot ISO image you downloaded previously as the Boot ISO Image:
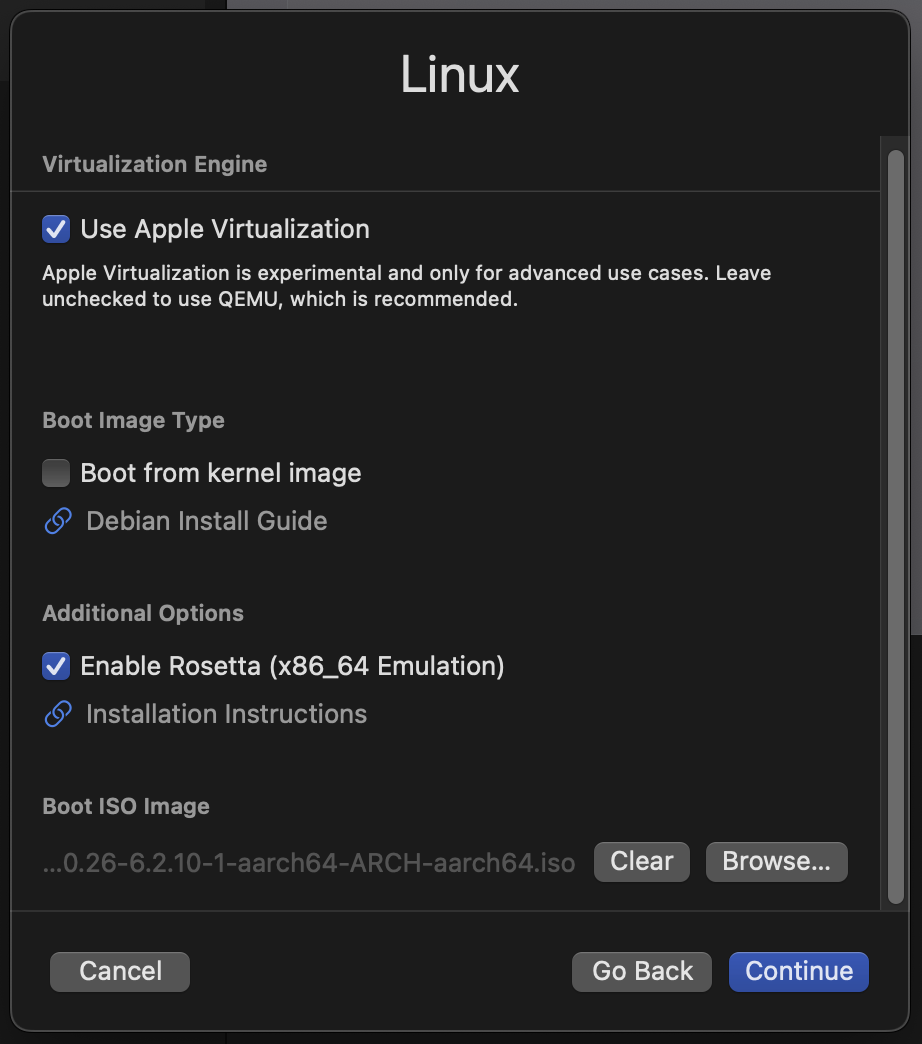 showing checked configuration boxes and ISO image
Configure your CPU and memory sizes as you desire, as well as your hard disk size. Bear in mind UTM won’t pre-allocate the entire hard disk, it will grow as the VM fills it up, so feel free to set it to something large.
You don’t need to configure any paths for the Shared Directory option now, but you can if you want. You can always update this later. I just selected my host’s ~/Desktop directory.
Finally save the VM.
Step 3: Boot the VM with a Serial interface
Now, before starting the VM, I recommend adding a Serial console to it. The reason is that it enables copying/pasting text from the host (since UTM has a nice serial interface) - this is very handy for running the initial commands and setting up the Arch environment.
You can do so by editing the VM you created and adding a Serial device here (just click Serial and save it, the defaults are all fine):
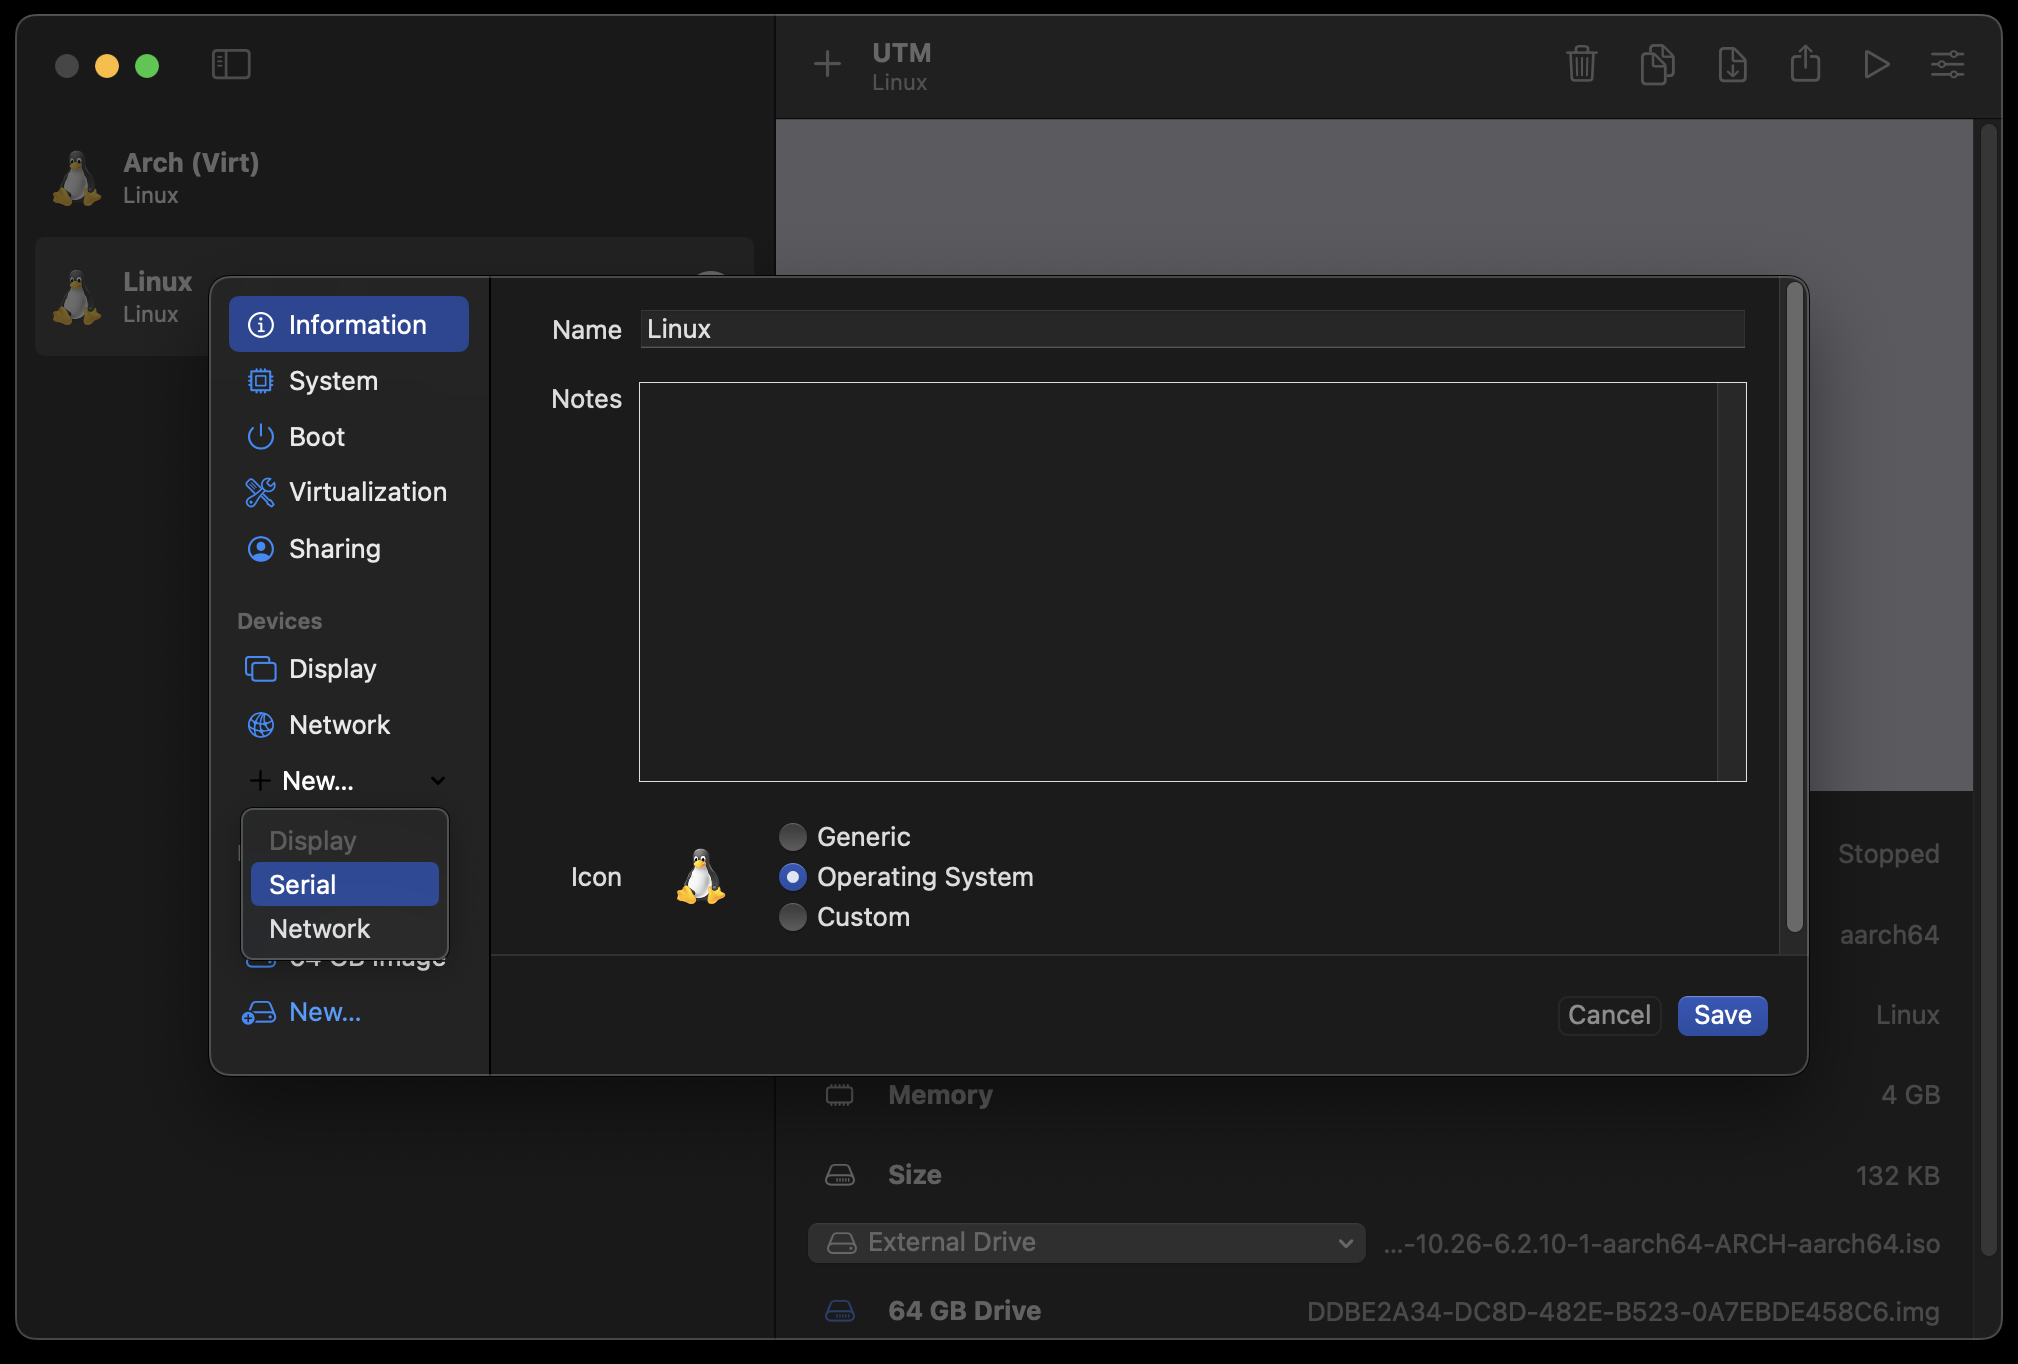 adding Serial device to VM
Now start the VM, and two windows will appear: one is the display and the other the serial interface. You’ll sometimes need to use the display to select archboot in the bootloader, etc. But once archboot configures itself you’ll be able to use the serial interface, which is what I did for bootstrapping the Arch system.
Step 4: Bootstrap Arch Linux
Now that archboot has booted, it will show a prompt. It’s entirely up to you how you configure your system, but I just ^C (remember, I’m using the serial interface) which drops me into a root shell:
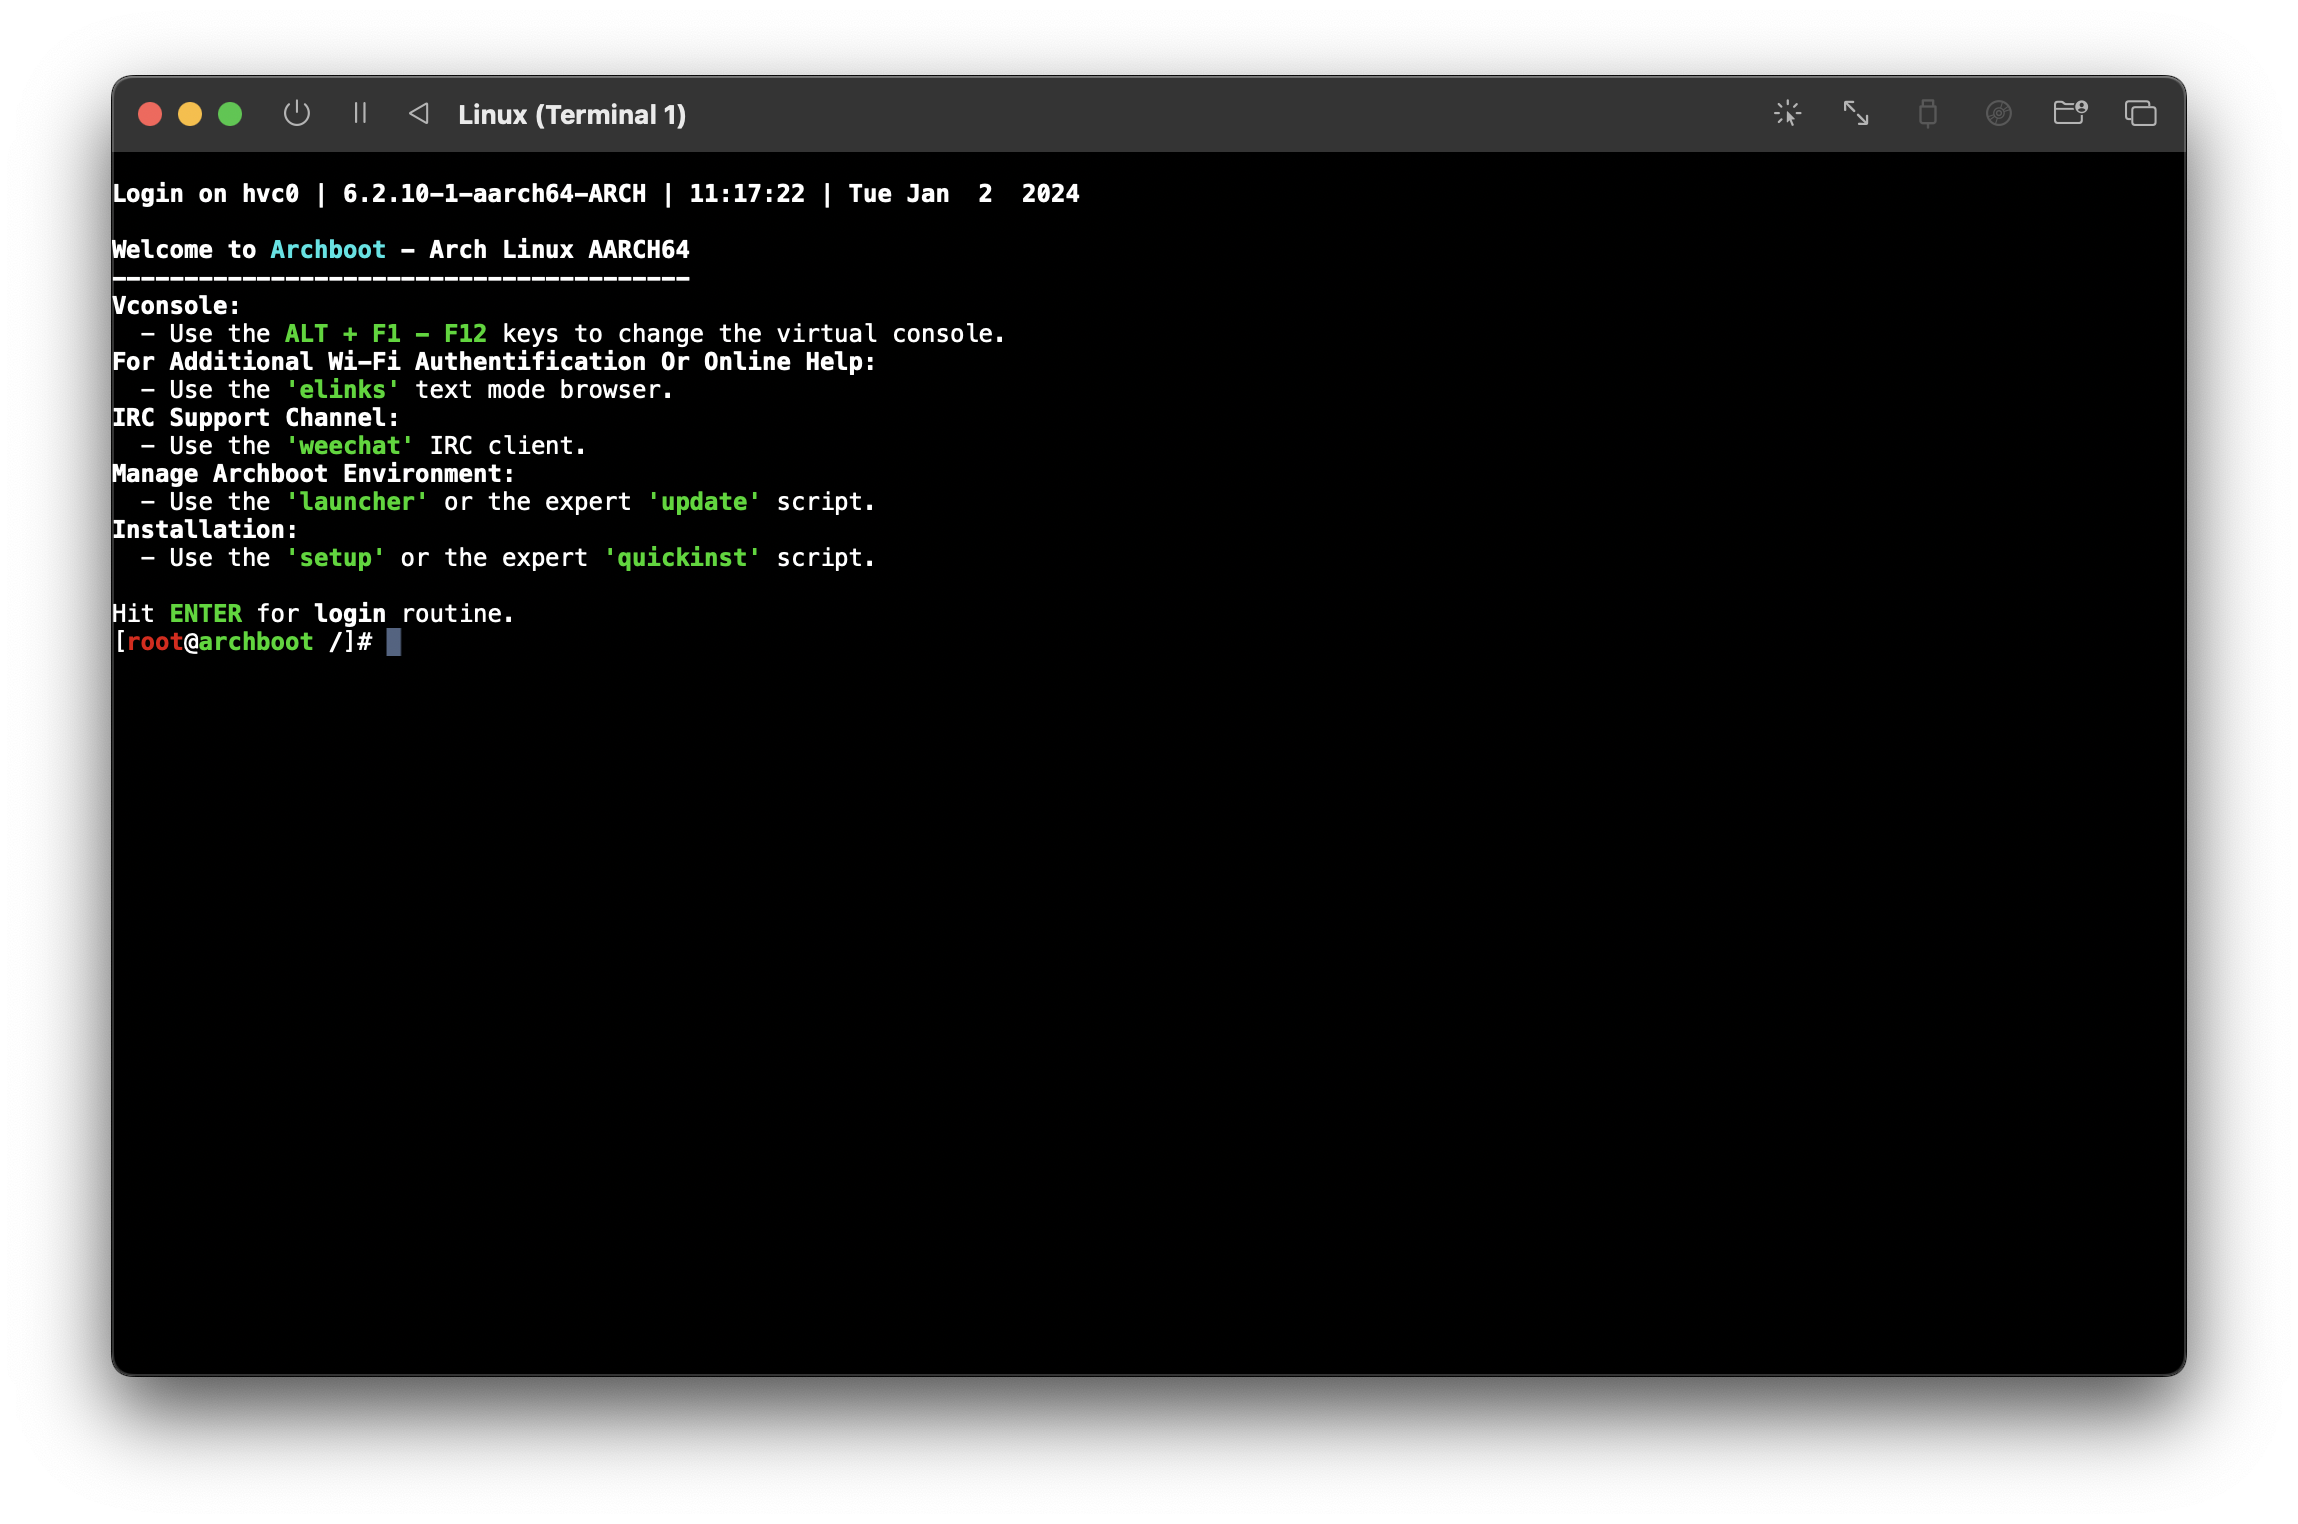 quitting archboot to get a shell
Issues installing packages with pacman?
Issues installing packages with pacman?
I had many signature is marginal trust issues when installing packages with pacman in the archboot environment. All the packages build by Arch Linux ARM Build System <[email protected]> were breaking.
I was able to fix this by locally signing the key:
pacman-key --lsign-key $(pacman-key --list-sig Build | head -2 | tail -1)
Useful information:
- The disk image is at
/dev/vda - The kernel package you need to install is
linux-aarch64 - I could not get LUKS decryption working at all at boot
- I could encrypt the disk just fine, and get everything setup, etc. The issue I faced was when it was time to boot the VM, after exiting
grubI could never get the LUKS decryption prompt to work. I didn’t investigate why fully, so I left my VM disk unencrypted for the time being.
- I could encrypt the disk just fine, and get everything setup, etc. The issue I faced was when it was time to boot the VM, after exiting
Brief overview of my process (not exact commands, just a summary):
# Partition `/dev/vda` with `fdisk`
# Created two partitions: /dev/vda1 (1G), and /dev/vda2 (rest)
fdisk /dev/vda

# Format partitions:
mkfs.fat -F32 /dev/vda1
mkfs.ext4 /dev/vda2

# Mount partitions:
mount /dev/vda2 /mnt
mkdir /mnt/boot
mount /dev/vda1 /mnt/boot

# Bootstrap Arch:
pacstrap /mnt base base-devel linux-aarch64 grub efibootmgr vi sudo networkmanager # <...other pkgs...>
genfstab -U /mnt >> /mnt/etc/fstab

# Chroot into installation for final setup:
arch-chroot /mnt

# Set root passwd:
passwd

# Configure a user account:
useradd -m $YOUR_USER
usermod -aG wheel $YOUR_USER
passwd $YOUR_USER
visudo # update sudoers however you want

# Install grub:
grub-install --target=arm64-efi --efi-directory=/boot --bootloader-id=grub
grub-mkconfig -o /boot/grub/grub.cfg

# Anything else you want to configure, things like:
# /etc/locale.conf
# /etc/hosts
# /etc/hostname
# /etc/localtime
# This is all just general system setup. You can follow the recommendations here:
# https://wiki.archlinux.org/title/Installation_guide#Configure_the_system
Remember, the most important things to do when bootstrapping the system are:
- Install
linux-aarch64 - Install a bootloader (I used
grub)
Now we’re ready to exit the chroot and poweroff the VM.
Step 5: Final Arch configuration
Install your display manager of choice, I’m not going to tell you what to do here. If you’re interested, I installed and used i3. This part is up to you, but keep in mind for maximum host-guest compatibility you should stick to using Xorg rather than Wayland since the SPICE Guest tools don’t work with Wayland.
Sharing clipboard between macOS host and Arch guest
Install spice-vdagent and qemu-guest-agent. Popular window servers (like GNOME and Plasma) should support starting the spice agent automatically via the autostart files (e.g., /usr/share/gdm/autostart/LoginWindow/spice-vdagent.desktop).
Minimal environments like i3 don’t, but simply make sure to spawn spice-vdagent when your i3 session starts.
As long as an Xorg server is running, spice-vdagentd is running (should automatically start after installing the above packages) and a spice-vdagent is also running, clipboard sharing should start working between the macOS host and the Arch guest.
Auto-resizing the guest display
The spice-vdagent and qemu-guest-agent packages also automatically support this. If you need to trigger a resolution change manually, it’s as easy as running:
xrandr --output Virtual-1 --auto
Getting sound to work in the Arch guest
By default no soundcards are found. This is actually because archlinuxarm’s linux-aarch64 package is compiled without CONFIG_SND_VIRTIO set! A little frustrating, but it can be easily fixed by turning that on and compiling our own kernel.
Here’s a brief overview of how I did it:
# clone archlinuxarm's packages repository
git clone https://github.com/archlinuxarm/PKGBUILDs
# enter directory containing `linux-aarch64`'s PKGBUILD
cd PKGBUILDs/core/linux-aarch64
Then update the package name, and also ensure that CONFIG_SND_VIRTIO is on, I set it to m (compile as a module). Here’s a diff of the PKGBUILD:
From fae13fc75ab3fd9699d0e1817917d523d8c8e7c4 Mon Sep 17 00:00:00 2001
From: acheronfail <[email protected]>
Date: Fri, 29 Dec 2023 09:04:24 +1030
Subject: [PATCH] CONFIG_SND_VIRTIO=m

---
 core/linux-aarch64/PKGBUILD                                  | 5 ++++-
 ...omebook.install => linux-aarch64-virt-chromebook.install} | 0
 .../{linux-aarch64.install => linux-aarch64-virt.install}    | 0
 3 files changed, 4 insertions(+), 1 deletion(-)
 rename core/linux-aarch64/{linux-aarch64-chromebook.install => linux-aarch64-virt-chromebook.install} (100%)
 rename core/linux-aarch64/{linux-aarch64.install => linux-aarch64-virt.install} (100%)

diff --git a/core/linux-aarch64/PKGBUILD b/core/linux-aarch64/PKGBUILD
index 374820de43..a9bc0a72e7 100644
--- a/core/linux-aarch64/PKGBUILD
+++ b/core/linux-aarch64/PKGBUILD
@@ -3,7 +3,7 @@

 buildarch=8

-pkgbase=linux-aarch64
+pkgbase=linux-aarch64-virt
 _srcname=linux-6.2
 _kernelname=${pkgbase#linux}
 _desc="AArch64 multi-platform"
@@ -12,6 +12,7 @@ pkgrel=1
 arch=('aarch64')
 url="http://www.kernel.org/"
 license=('GPL2')
+conflicts=('linux-aarch64')
 makedepends=('xmlto' 'docbook-xsl' 'kmod' 'inetutils' 'bc' 'git' 'uboot-tools' 'vboot-utils' 'dtc')
 options=('!strip')
 source=("http://www.kernel.org/pub/linux/kernel/v6.x/${_srcname}.tar.xz"
@@ -53,6 +54,8 @@ prepare() {
   git apply ../0002-arm64-dts-rockchip-disable-pwm0-on-rk3399-firefly.patch

   cat "${srcdir}/config" > ./.config
+
+  echo 'CONFIG_SND_VIRTIO=m' >> ./.config
 }

 build() {
diff --git a/core/linux-aarch64/linux-aarch64-chromebook.install b/core/linux-aarch64/linux-aarch64-virt-chromebook.install
similarity index 100%
rename from core/linux-aarch64/linux-aarch64-chromebook.install
rename to core/linux-aarch64/linux-aarch64-virt-chromebook.install
diff --git a/core/linux-aarch64/linux-aarch64.install b/core/linux-aarch64/linux-aarch64-virt.install
similarity index 100%
rename from core/linux-aarch64/linux-aarch64.install
rename to core/linux-aarch64/linux-aarch64-virt.install
Then build and install the package: makepkg -si.
Bear in mind compiling the kernel can take a while… It took my VM a little over an hour to compile it. Once you’ve installed the kernel with CONFIG_SND_VIRTIO=m, just reboot and sound will work without any issue.
Make sure to install
pipewire, etc if you’re running something likei3which doesn’t do that for you automatically!
Setup Rosetta for x86_64 emulation in the VM
Setting up Rosetta x86_64 emulation is fairly straightforward on an Arch system. The first thing to do is to mount the rosetta into the guest. You can do this a single time with:
mount -t virtiofs rosetta /media/rosetta
And configure it to automatically mount at boot by adding this to /etc/fstab:
rosetta /media/rosetta virtiofs ro,nofail 0 0
Next we have to register the x86_64 binary format with binfmt:
# Create /etc/binfmt.d/rosetta.conf:
mkdir -p /etc/binfmt.d/
echo ':rosetta:M::\\x7fELF\\x02\\x01\\x01\\x00\\x00\\x00\\x00\\x00\\x00\\x00\\x00\\x00\\x02\\x00\\x3e\\x00:\\xff\\xff\\xff\\xff\\xff\\xfe\\xfe\\x00\\xff\\xff\\xff\\xff\\xff\\xff\\xff\\xff\\xfe\\xff\\xff\\xff:/media/rosetta/rosetta:CF' > /etc/binfmt.d/rosetta.conf

# Enable binfmt configuration at boot:
systemctl enable systemd-binfmt.service
Next time you boot, you should be able to run x86_64 binaries without trouble at all. This is especially useful for things like docker. Here’s an example running an x86_64 docker image in the aarch64 VM:
# Running aarch64 docker container (native arch):
docker run --rm -ti --platform "linux/arm64" ubuntu uname -a
Linux e92da6d4353c 6.2.0-1-aarch64-virt-ARCH #1 SMP PREEMPT_DYNAMIC Fri Dec 29 08:34:59 ACDT 2023 aarch64 aarch64 aarch64 GNU/Linux

# Running x86_64 docker container (via rosetta):
docker run --rm -ti --platform "linux/amd64" ubuntu uname -a
Linux 46e44ec1d041 6.2.0-1-aarch64-virt-ARCH #1 SMP PREEMPT_DYNAMIC Fri Dec 29 08:34:59 ACDT 2023 x86_64 x86_64 x86_64 GNU/Linux
Setup Shared Directories
This is also very easy. Ensure you’ve configured a share directory in UTM’s settings for the VM. Once you’ve done that, just:
mount -t virtiofs share /media/share
And configure it to automatically mount at boot by adding this to /etc/fstab:
share /media/share virtiofs ro,nofail 0 0
You’ll then have all the directories you’ve shared with your VM appear under /media/share. Simple!
Automatic time synchronisation
One problem with running in a VM, is that when the host operating system (macOS) sleeps, the VM is paused. This means that the VM’s time will drift out of sync.
There are a few solutions to this problem that require a network connection, like setting up ntp in the guest, etc. But I wanted something more robust and something that worked offline.
My solution was to use a program called sleepwatcher on the macOS host, and update the VM’s time each time the host wakes up from sleep.
First, install and configure sleepwatcher on the host:
# first, install sleepwatcher on macOS host
brew install sleepwatcher

# next, start its daemon (also starts it on boot/login):
brew services start sleepwatcher
Now that sleepwatcher is setup on the macOS host, if a script exists at ~/.wakeup it will be run each time the machine wakes from sleep.
Create script to set time in VM on wakeup:
cat ~/.wakeup
#!/usr/bin/env bash

# Set VM's time to current time:
ssh -o ConnectTimeout=2 [email protected] sudo date -s "'$(date)'"
There’s the ConnectTimeout option in case the VM isn’t running.
Obviously check the username and IP address of your VM, and update accordingly.
This is mostly just an example.
Also since this uses ssh, remember to copy your host’s public SSH key to the VM’s ~/.ssh/authorized_keys!
Configure VM to allow SSH and set time:
I’ve set it so any user that’s part of the wheel group can use date without a sudo password:
cat /etc/sudoers | grep date
%wheel ALL=(root) NOPASSWD: /usr/bin/date *
Now, if the VM is running, whenever the macOS host resumes from sleep, it will update the VM’s time to the correct time.
Potentially useful links
These are things I found useful while I was working out all the kinks:
- https://archboot.com/#iso
- https://docs.getutm.app/advanced/rosetta/
- https://docs.getutm.app/guest-support/linux/#macos-virtiofs
- https://blog.vkhitrin.com/booting-arch-linux-using-apple-virtualization-framework-with-utm/
- https://mybyways.com/blog/using-rosetta-in-a-utm-linux-vm-with-docker-on-apple-silicon
- https://qiita.com/honeniq/items/eed06c6b436db215b0b0
Last updated: Sunday, February 11, 2024 at 14:28
Fixing the Steam Deck’s on-screen keyboard in Battle.net
So, Battle.net on the Steam Deck was working fine for me for quite some time, and then I started experiencing issues with Steam’s on-screen keyboard. Maybe something changed with an update, I’m not sure what caused this.
When Battle.net opens its login window the Steam on-screen keyboard began to glitch like mad - opening and closing in a super fast loop. This ended up crashing steam; but most frustrating of all meant I couldn’t login to Battle.net, even with my credentials saved, the crash meant it no longer worked.
The workaround
In each proton wine prefix, there’s an executable file called steam.exe. It seems this file is responsible for detecting when the on-screen keyboard needs to appear. This file is also regenerated every time a game is run, so we can’t just remove it: we need to replace it with something that can’t be overwritten.
1. Get terminal access
Multiple options available to you here:
- Open
Konsolefrom the Steam Deck’s Desktop mode - SSH to your Steam Deck from another machine
2. Find Battle.net’s proton wine prefix
I usually do this by opening protontricks in Desktop Mode, scrolling the list until I see the Battle.net game in there, and remembering the numerical id.
Your prefix should be something like this:
/home/deck/.local/share/Steam/steamapps/compatdata/<battle net id here>
3. Replace steam.exe with an immutable file
We’re going to delete the steam.exe file in that prefix, and replace it with a file that can’t be overwritten (it’s this file that’s causing the crash).
# change to the proton wine prefix directory
cd /home/deck/.local/share/Steam/steamapps/compatdata/<battle net id here>/

# delete `steam.exe`
rm 'pfx/drive_c/Program Files (x86)/Steam/steam.exe'

# put an immutable file at its location
sudo chattr +i 'pfx/drive_c/Program Files (x86)/Steam/steam.exe'
The first command rm removes the existing file (don’t worry about permanently deleting something, if you remove the file later, Steam will try to replace it each time the game is started, so this is completely reversible).
The second command sudo chattr +i creates an immutable file - basically it says “this file cannot be deleted, overwritten, renamed, linked to, etc”. This is what stops Steam from replacing it each time the game starts.
4. Enjoy
Start Battle.net again. Now, the glitchy keyboard thing will be gone! 🎉
In case you’re wondering:
- The Steam on-screen keyboard still works (opening via the steam + x shortcut)
- As far as I can tell, removing
steam.exedoesn’t change anything at all
Reverting this change
If you want to reverse this, then change the chattr command to sudo chattr -i (with - instead of +). Once you’ve done that, re-run the game and Steam will replace the steam.exe with a new copy.
Last updated: Sunday, February 11, 2024 at 14:28
Transferring files over a serial connection
I had an internet connection that required a DSL modem to use, and so I looked at openwrt.org for their DSL compatible modems, and found the TP-Link TD-W8970 v1. After an extremely quick glance at top of the page, I saw that ADSL/VDSL works, and proceeded to purchase one since they were quite cheap.
Little did I know this router had a far greater obstacle than I expected…
What I neglected to notice on the page for the TP-Link TD-W8970 v1 was how to install OpenWrt on the device. 😅
Turns out, it’s not as simple as other routers I’ve used in the past (you just download the upgrade package, and install it). Not all is bad though, this is what is listed in the Installation instructions:
There are two viable ways to install OpenWrt; the “classic” method using serial access, or the “web interface hack” which allows to flash the firmware without opening the case!
Well! That “web interface hack” sounds pretty good to me!
Flashing OpenWrt without opening the case
Unfortunately, the SSID Config Injection method didn’t work with the firmware that the router came pre-installed with.
And more unfortunately, after getting a root shell with the StatPost method, I once again neglected to read all the finer details of the page and made a mistake.
For what it’s worth, the process of flashing the device without opening the case is this:
- First, download the 15.05 OpenWrt image for the router
- Next, once you have a root shell via the StatPost approach, backup your router’s original firmware:
# Insert a USB or HDD into one of the USB ports of the router, it will be
# mounted at /var/usbdisk/*
cat /dev/mtd0 > /var/usbdisk/sda1/td-w8970/mtd0
cat /dev/mtd1 > /var/usbdisk/sda1/td-w8970/mtd1
cat /dev/mtd2 > /var/usbdisk/sda1/td-w8970/mtd2
cat /dev/mtd3 > /var/usbdisk/sda1/td-w8970/mtd3
cat /dev/mtd4 > /var/usbdisk/sda1/td-w8970/mtd4
cat /dev/mtd5 > /var/usbdisk/sda1/td-w8970/mtd5
cat /dev/mtd6 > /var/usbdisk/sda1/td-w8970/mtd6
- Check the size of
/dev/mtd1
# For my router, it's 1310720 bytes
ls -l /var/usbdisk/sda1/td-w8970/mtd1
- Prepare the 15.05 OpenWrt image
# Split the install image into two parts. We do this since the image won't fit
# all into /dev/mtd1, and we will put the remaining into /dev/mtd2
dd if=openwrt-lantiq-xrx200-TDW8970-sysupgrade.image bs=1310720 skip=1 of=openwrt-lantiq-xrx200-TDW8970-sysupgrade-1.image
- ⚠️ don’t be dumb like me ⚠️
This is the part I missed when reading the installation guide:
Rumours are that with the recent OpenWrt that you need to take care that the image you write to
mtd2needs to be extended with0xffcharacters to the end of the partition
So, please don’t do what I did, and please ensure that you do this! 🙏
Get the length of mtd2:
# On my router, it's 6684672 bytes
ls -l /var/usbdisk/sda1/td-w8970/mtd2
And as the page suggests, let’s extend the image we’ll write to mtd2 with 0xff characters:
# Let's extend the second part that we created earlier
# First, we'll create a file full of 0xff bytes that's the right size
# (td uses octal, and 0xff in octal is \377)
dd if=/dev/zero bs=6684672 count=1 | tr "\000" "\377" > mtd2.image
# Now we insert the original file at the start of the image
# Note that `conv=notrunc` will make sure the file isn't truncated
dd if=openwrt-lantiq-xrx200-TDW8970-sysupgrade.image of=mtd2.image conv=notrunc
# And finally, we'll replace the original file with the padded one
mv mtd2.image openwrt-lantiq-xrx200-TDW8970-sysupgrade.image
- Flash OpenWrt to the device
It’s crunch time. With the files we created on the computer, let’s move them to the USB device and proceed to flash the router.
cat /var/usbdisk/sda1/td-w8970/openwrt-lantiq-xrx200-TDW8970-sysupgrade.image > /dev/mtdblock1
cat /var/usbdisk/sda1/td-w8970/openwrt-lantiq-xrx200-TDW8970-sysupgrade-1.image > /dev/mtdblock2
It’s normal for the first
catcommand above to print:cat: write error: No space left on devicesince the original image is too large for
mtd1. But that’s alright, since we write the remaining portion tomtd2.
Once you reboot (by power cycling the device) it should boot in OpenWrt!
…“should” being the key word there… as I mentioned above, I didn’t do these all correctly, and my device bricked. 🤦♂️
Unbricking the router
Sigh.
Alright, I guess I’m doing this the hard way since I missed that thing about padding the file and my router’s now bricked.
Looks like I need to get a USB to TTL Serial UART. I didn’t have one, so I purchased this one: https://core-electronics.com.au/usb-to-ttl-serial-uart-rs232-adaptor-pl2303hx.html
… a few days later …
Alright, here I am. Following the guide’s steps on connecting the adaptor to the TD-W8970 Serial interface. As noted in the guide, the ground pin was a little hard to get to, so I ended up using the alternative they suggested.
This was my result:
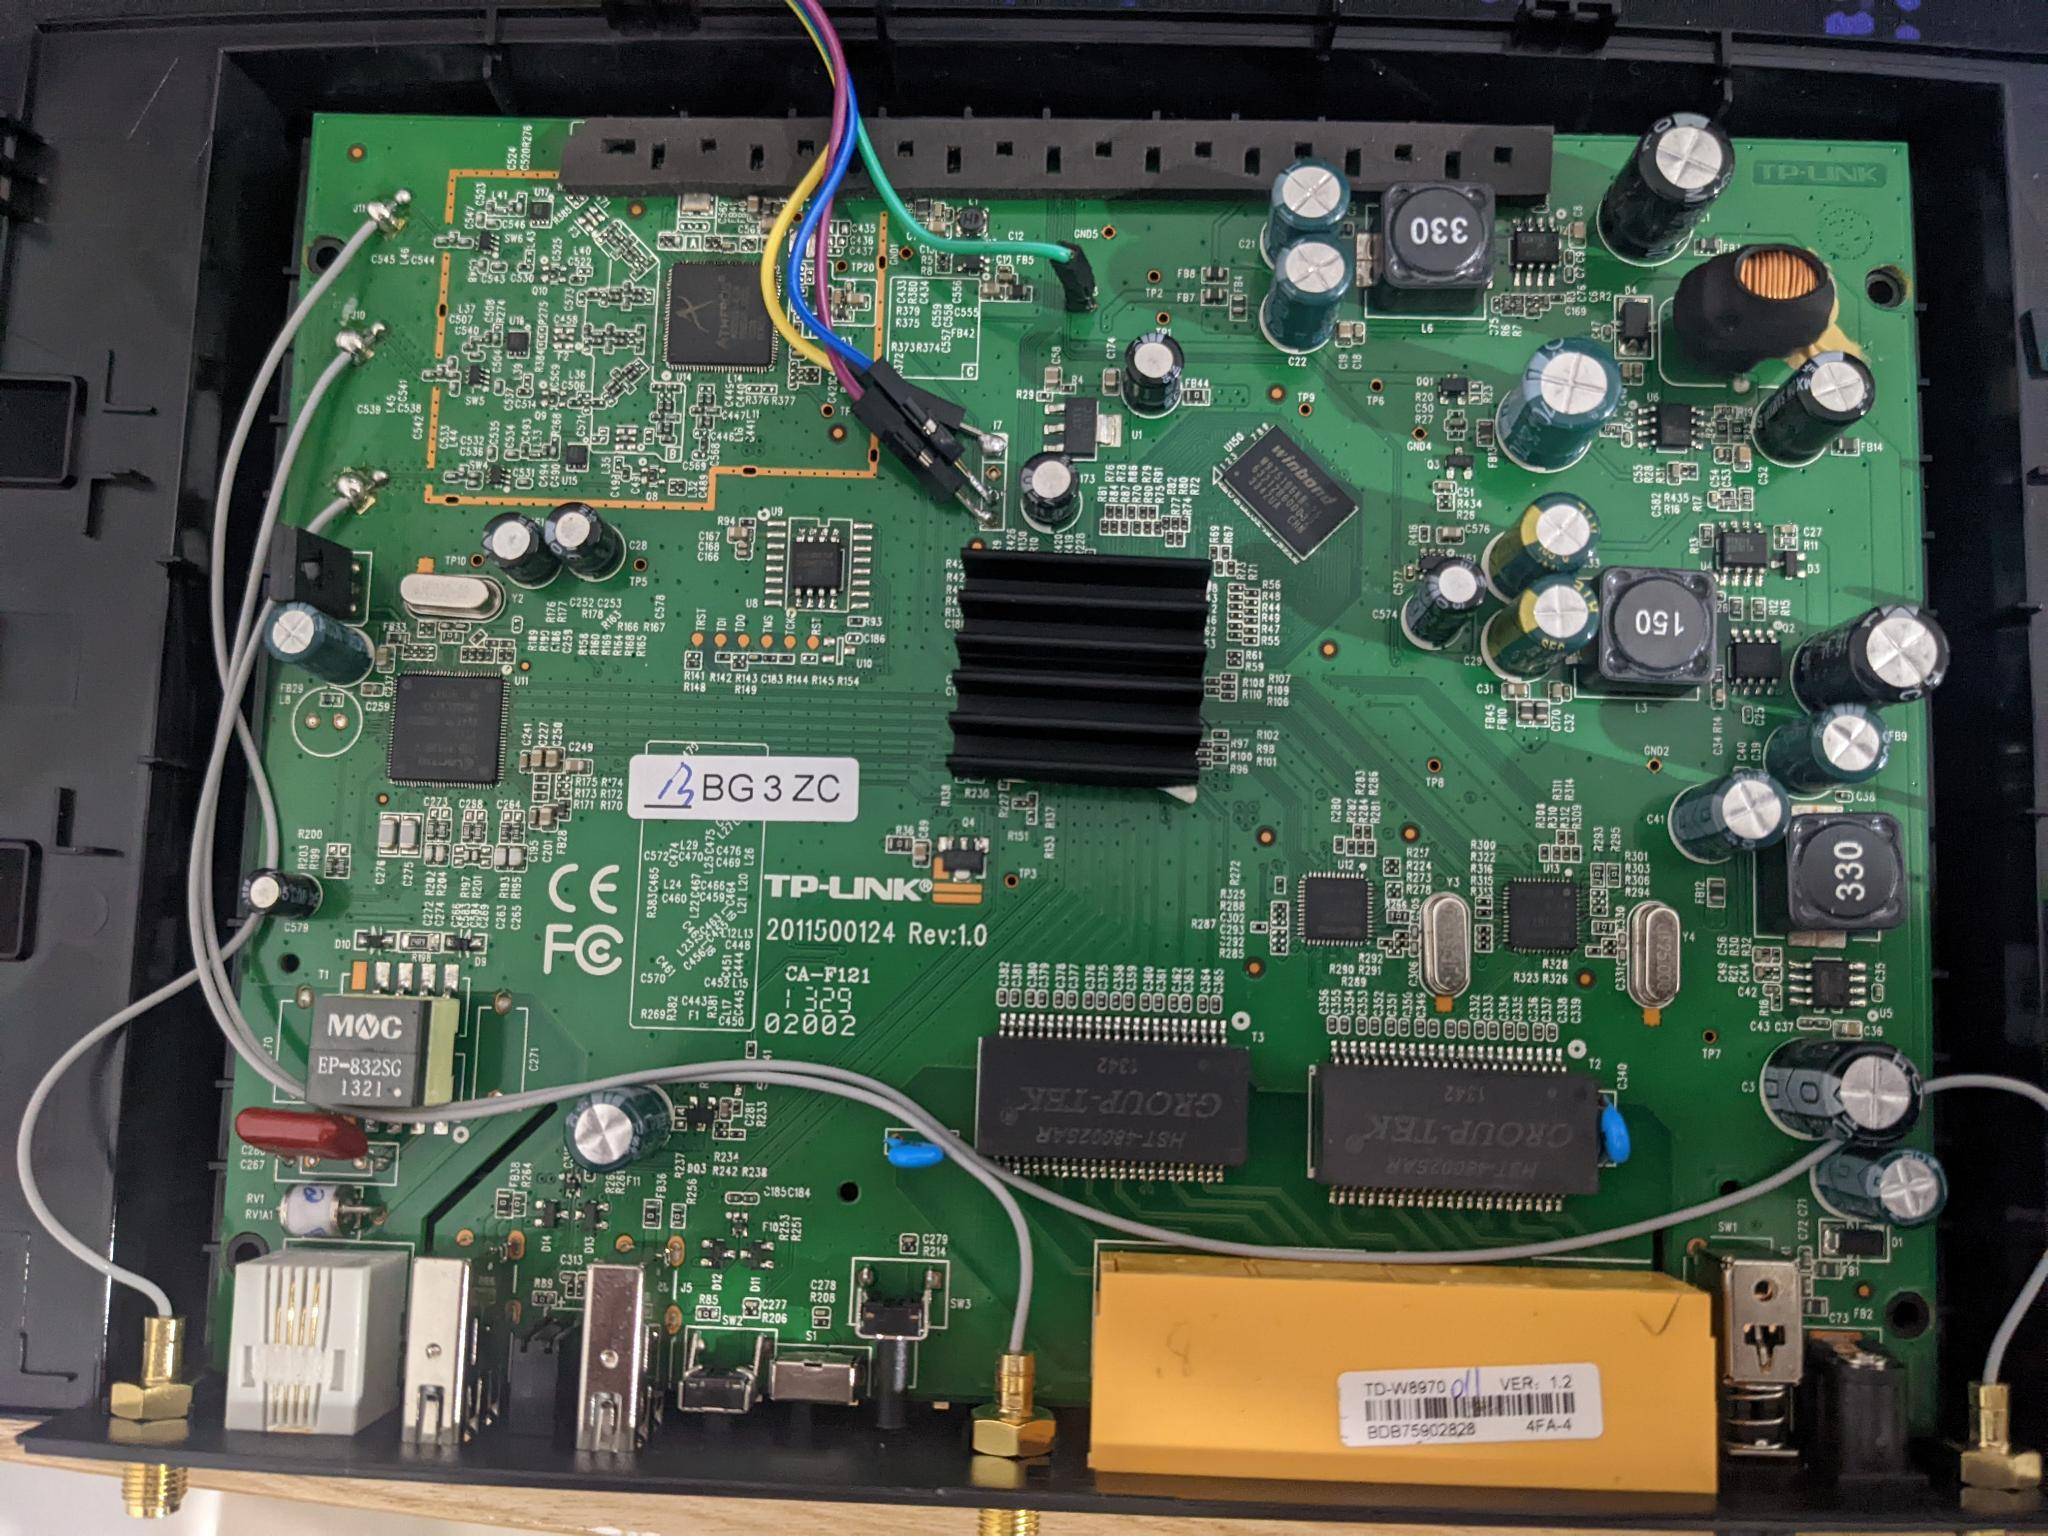 serial wires soldered onto router
 serial wires soldered onto router (close up)
And yes, this was my first time soldering. And also yes, I did an awful job. But hey, the serial connection seems stable, and things are looking fine to me so far!
When I connect to the TTY (if you don’t know, OpenWrt has a good guide), I see this:
ROM VER: 1.1.4
CFG 01

ROM VER: 1.1.4
CFG 01

ROM VER: 1.1.4
CFG 01

... repeating endlessly forever ...
Hey! I’m actually receiving data that’s not completely corrupt - for a first time soldering, I’m just happy it seems to be working.
Well, the guide did mention that pressing t will interrupt the boot sequence, and apparently then I can login with admin/1234.
… presses t and waits …
Oh come on! Nothing’s happening. Was it my poor soldering?
Well, if it’s not my soldering, then I have to assume inputs are working… Though after mashing the keyboard, nothing seems to change, the characters I’m sending aren’t even printed to the TTY… So I’m not even sure.
In the guide there is a section on UART booting; looks like all we have to do is ground a resister called R255.
Let’s try grounding that.
… an embarrassingly long amount of time later …
Alright, I swear I looked at every resister a hundred times and I couldn’t find the one mentioned on the page.
Don’t be thick like me. It’s on the bottom side of the board:
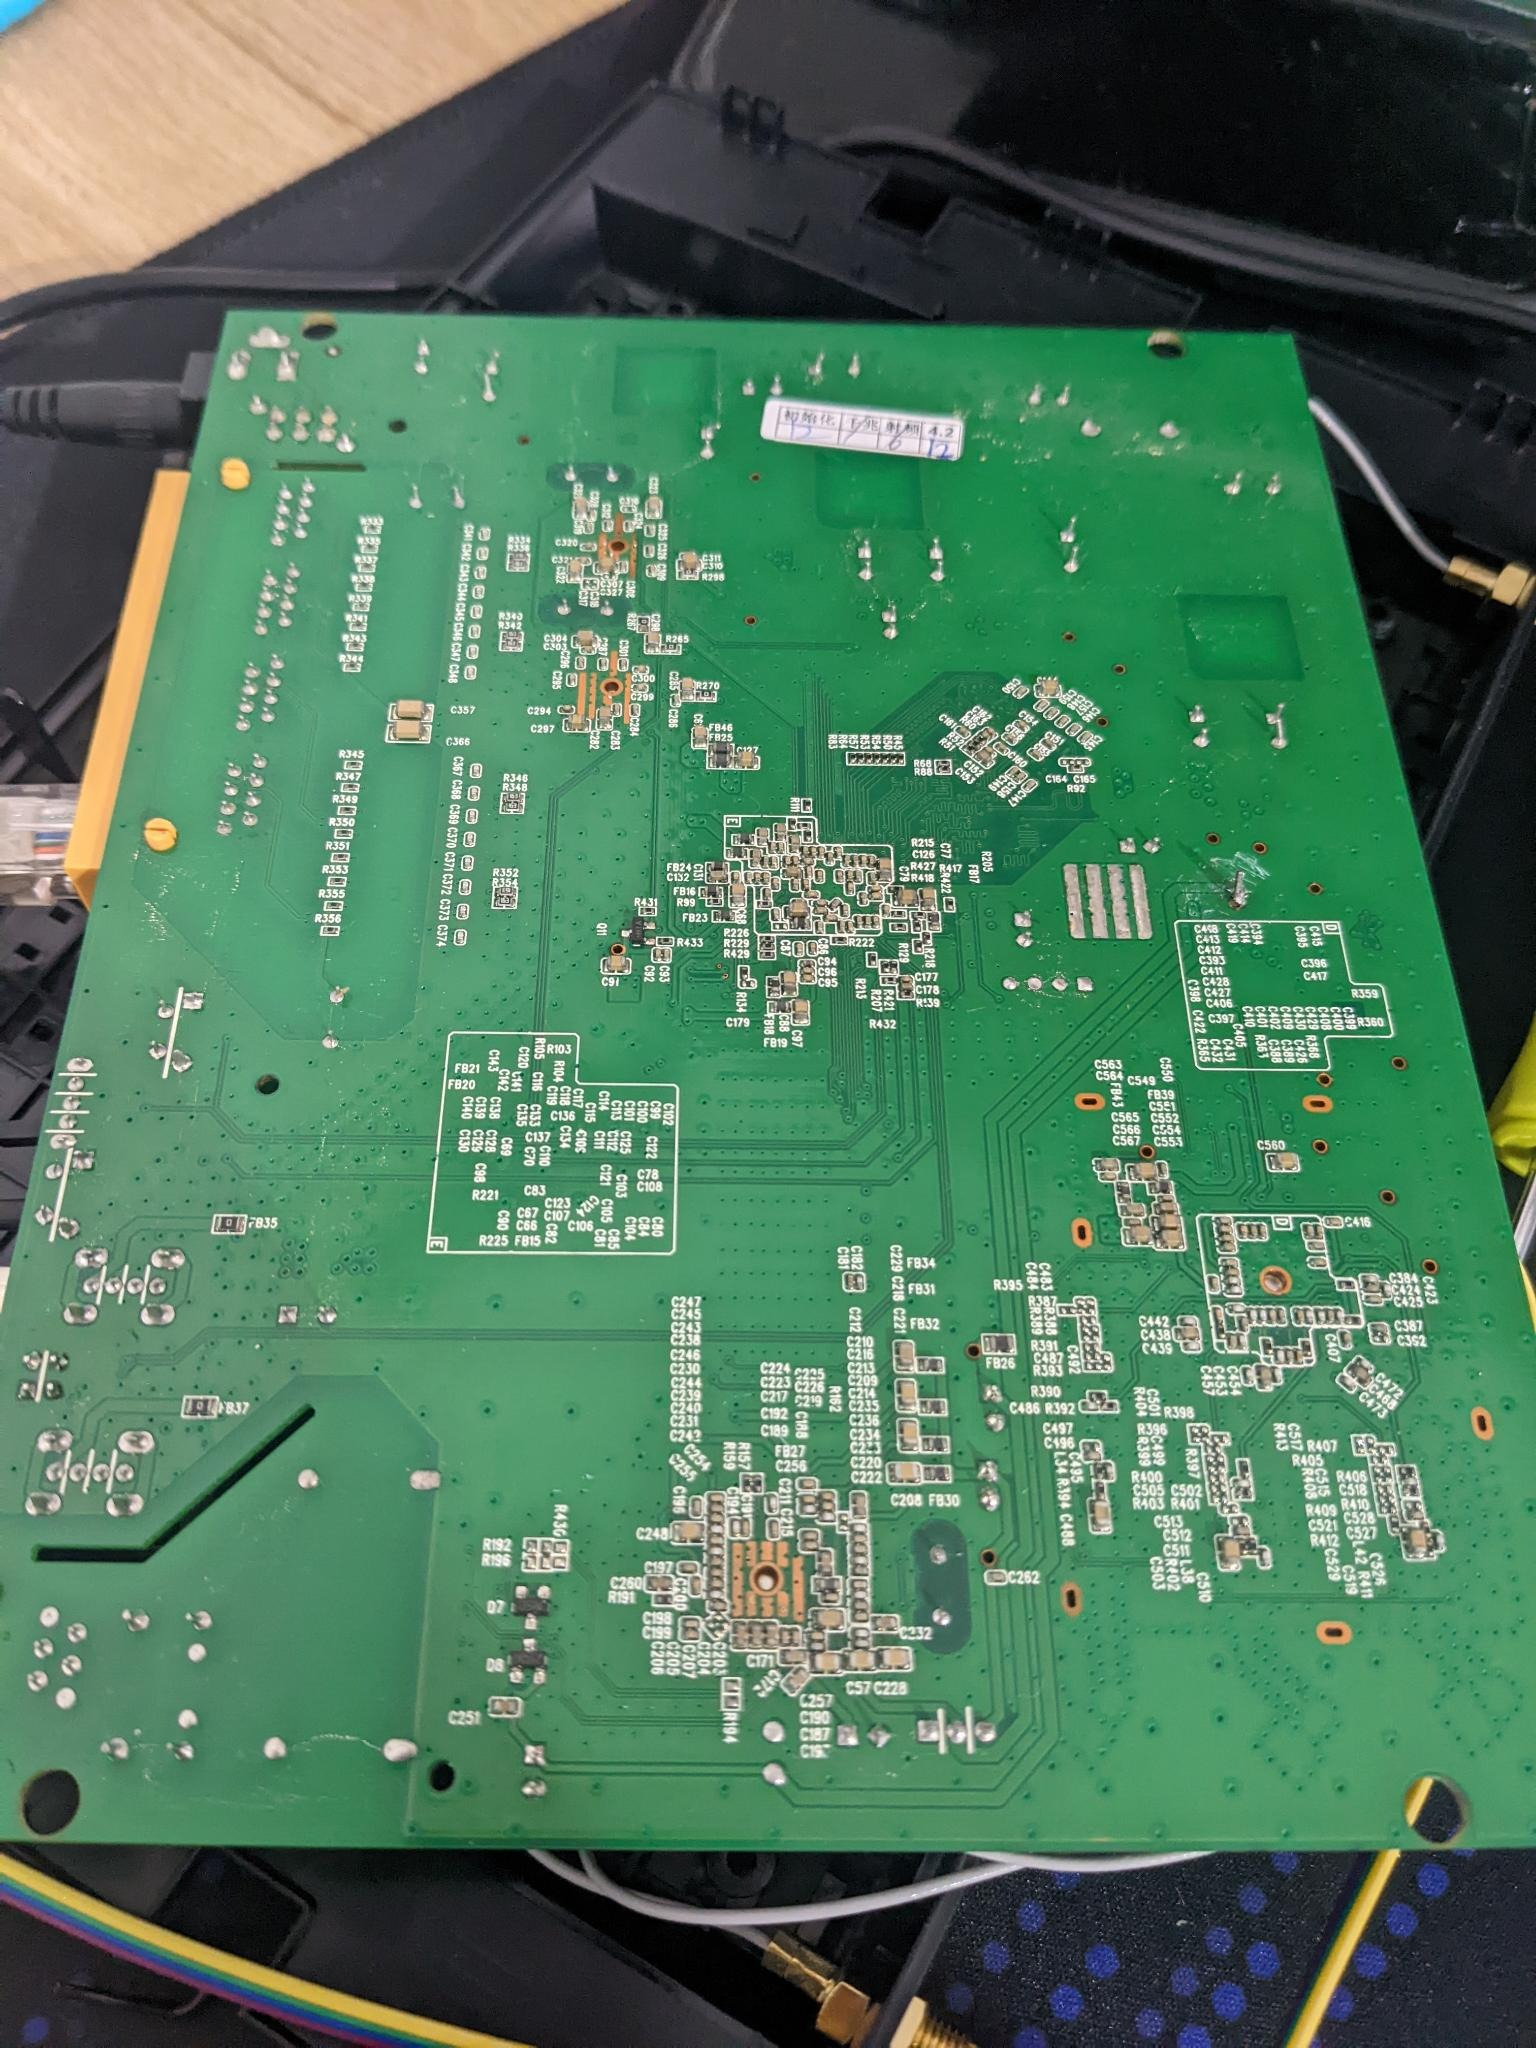 Underneath the Router
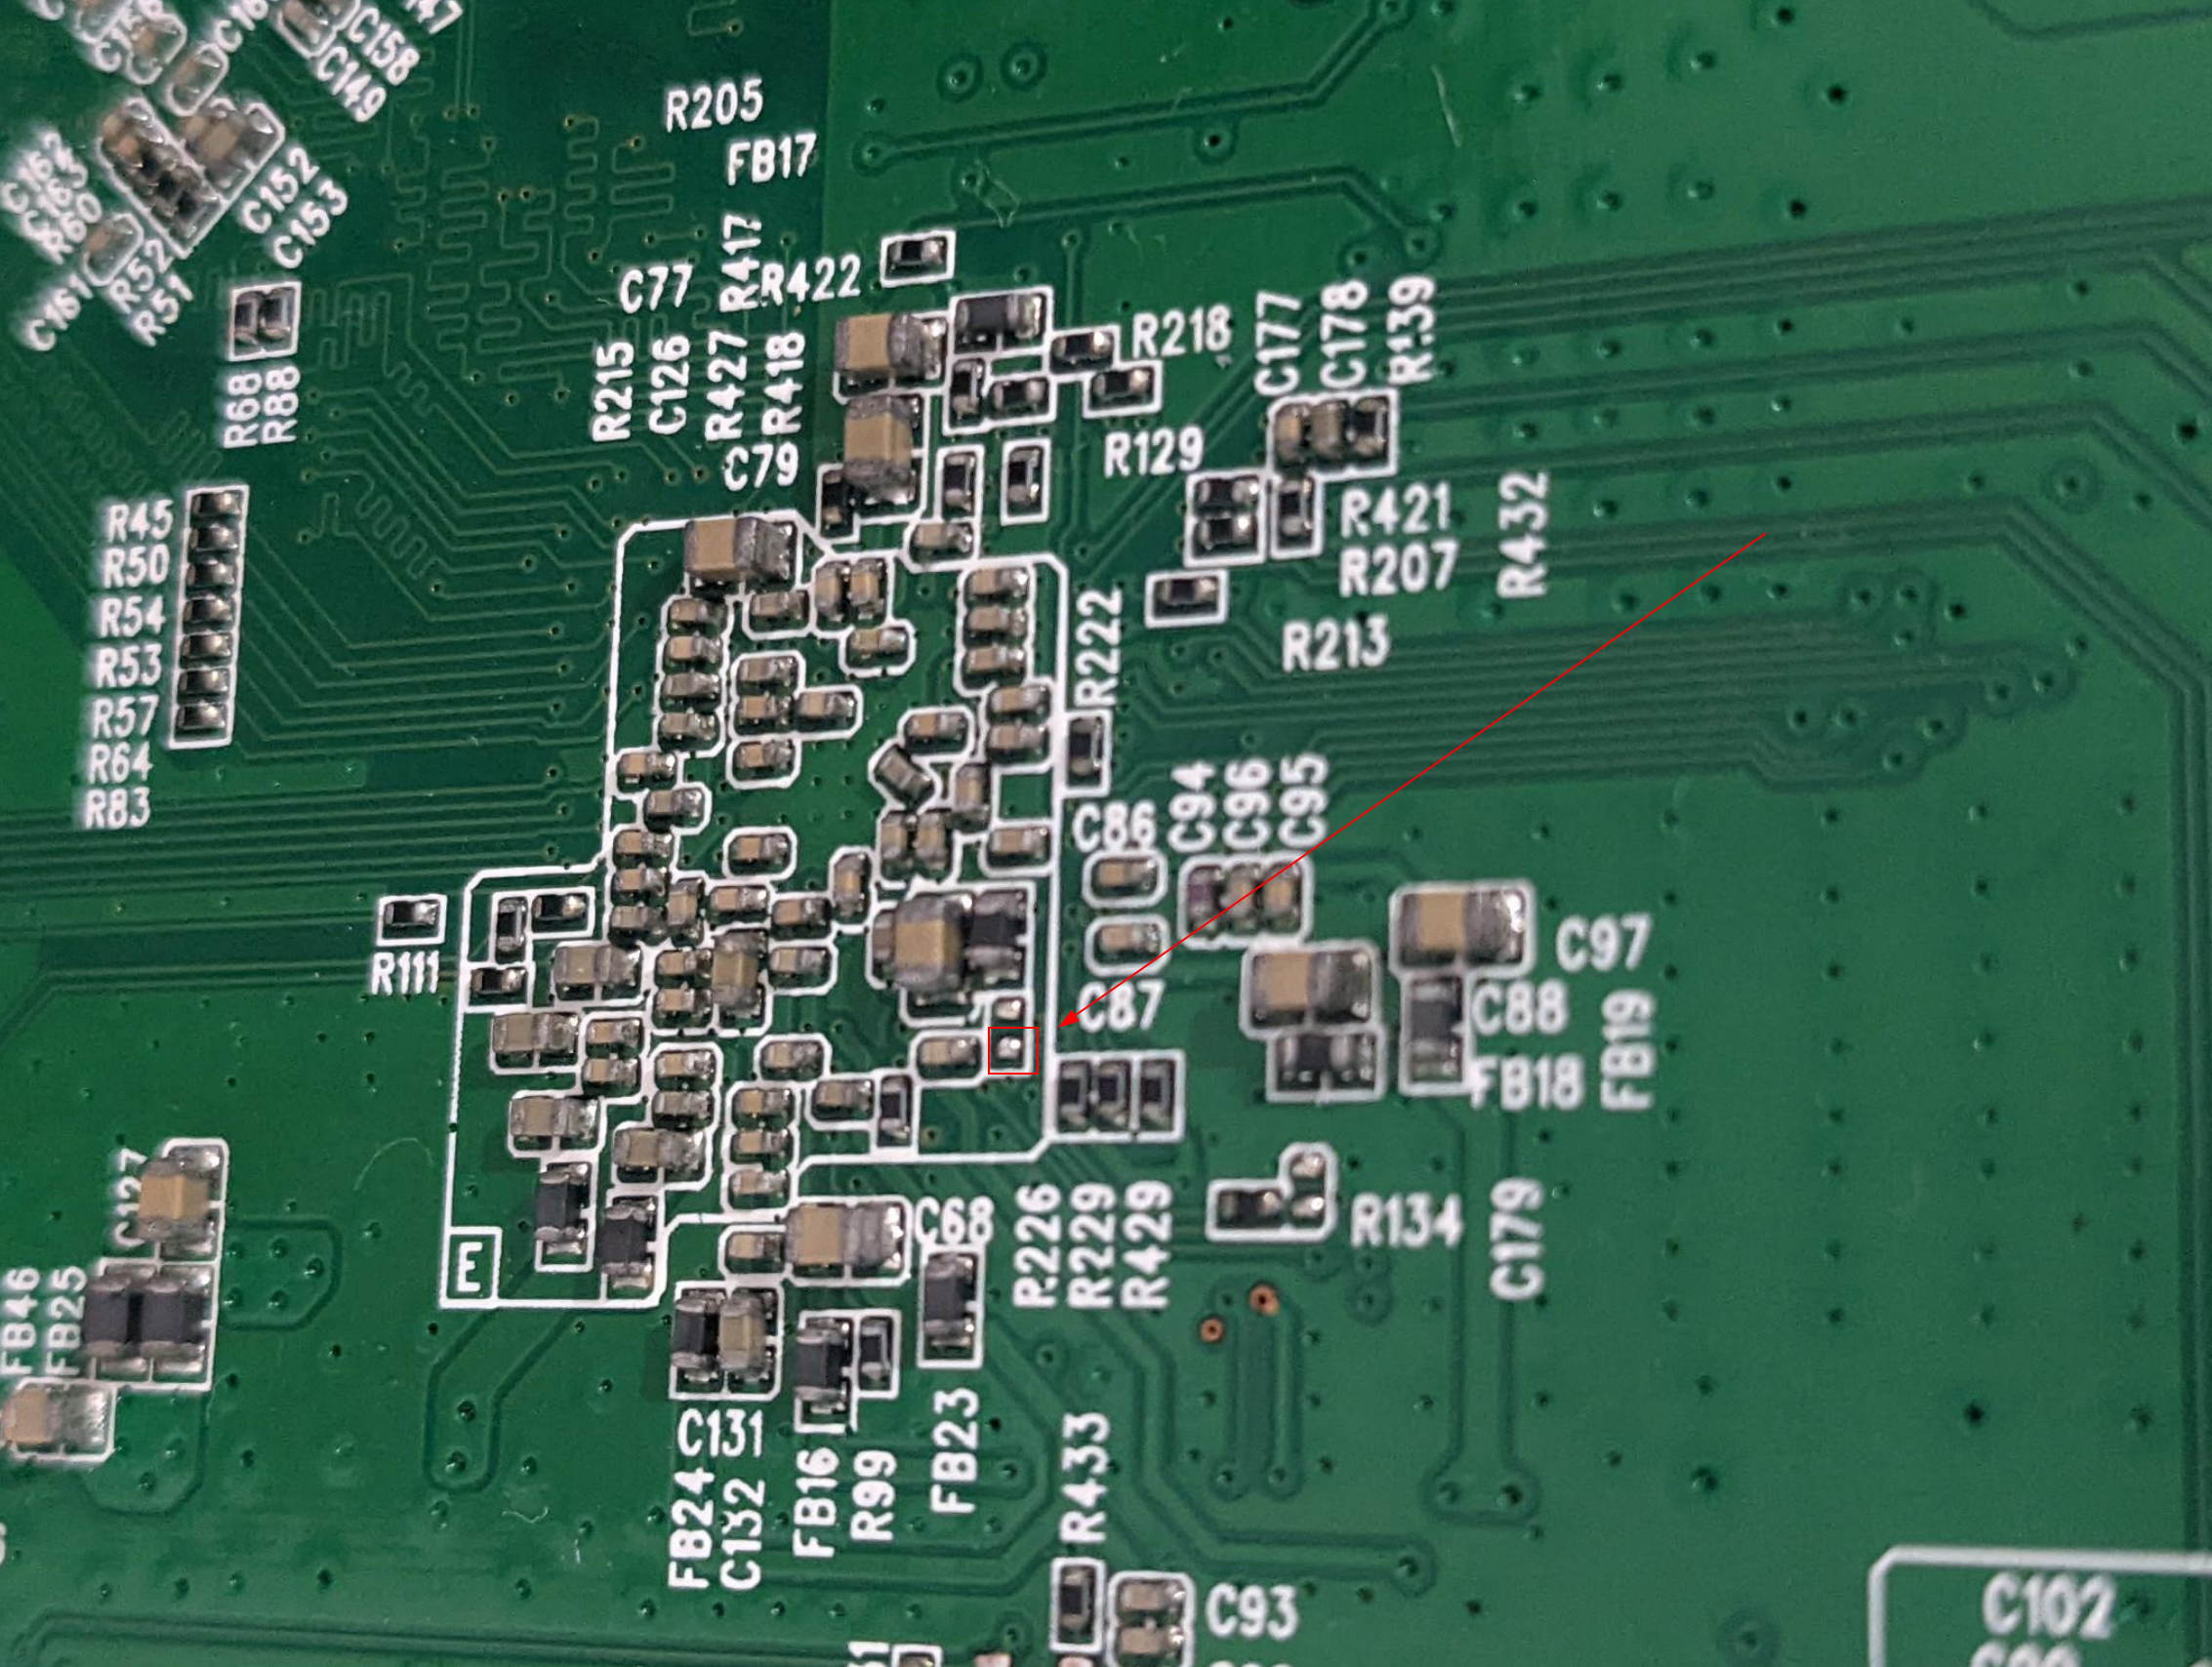 Location of R255
So grounding R255 before boot, during boot or after boot did… Nothing.
After a period of time that was far too long, I realised that those guides about pressing t, the admin/1234 login and grounding R255 are for the original router firmware. The original router firmware that I overwrote already with OpenWrt. So this isn’t TP-Link boot-looping, it’s OpenWrt!
After combing through some more OpenWrt forums, some archived, some for other routers, I figured out a way to get it out of it’s apparently bricked and boot-looping state:
As fast as you can after turning it on (you’ll see the ROM VER ... commands still printing) hit ctrl+C!
This stops the boot process and drops me into a shell!
💪 Progress!
Alright! Now we have a shell again!
So we’ve got root access to a broken OpenWrt, let’s fix this router and unbrick it.
What tools do we have at our disposal?
- 🙁 The wireless doesn’t work and can’t be setup, or turned on
- 😟 The ethernet ports don’t work
- 😫 The USB ports don’t work
- 😩 The reset button doesn’t seem do anything
- 😢 In fact, this router doesn’t do anything except allow a serial connection, and print a bunch of errors about corrupted filesystems while it boots.
Well… Alright. I guess let’s just download the latest release of OpenWrt for the device, copy that onto it with the serial connection and then just sysupgrade from there. Easy, right?
No. Not so easy.
Apparently, copying binary files over a serial connection isn’t the simplest thing.
Especially when the device you’re copying to is a very bare-bones system.
Transferring the new firmware over serial
Let’s consider our constraints:
- No network access
- No USB access
- We only have ~29M of RAM on this device, mounted in
/tmp - The only way we can communicate is via our Serial UART interface
- We don’t have any tools for transferring data easily, in text format, or over serial connections installed on the router
Alright. Let’s do this the dumb way.
It may be dumb, but it’s simple, and it should work.
My plan is:
- Download the latest (at this time 21.02.2) OpenWrt firmware for the device
- Convert this file to ASCII (so it’s safe to send over the serial TTY)
- Send the ASCII file over the serial connection
- Rebuild the firmware file from its ASCII representation
- Run
sysupgrade openwrt.binon the router and revive it
The first problem
The first thing I think of when converting a binary to ASCII is base64.
But, if the device doesn’t have base64, what options do we have?
I did find a base64 shell script but after some tests that thing totally died on files over a megabyte. The firmware image in its binary format is already 6.4M, and as base64 it’s over 9M. Sadly, this wasn’t an easy win.
With some more searching, I discovered someone had quite a similar issue to me, and solved it with lrzsz. Alas, I failed to find any lrzsz packages for the later versions of OpenWrt I was using, and even when I tried to use the older ones the router was missing the required libs to even run it. So, rather than transferring an entirely old OS over to the router one file at a time, I decided I’d take inspiration from this approach, but go down a slightly different route.
With that in mind, all I had to do was print every byte of the file in hexadecimal, and rebuild it later on. That’s easy enough:
# openwrt.bin is the new 21.02.2 image file
xxd -g1 openwrt.bin > openwrt.txt

# remove the prefix and suffix that `xxd` generates
sed -i 's/^\(.\)\{9\}//g' openwrt.txt
sed -i 's/\(.\)\{16\}$//g' openwrt.txt
Let’s test this can be converted back without xxd (since the router doesn’t have that):
# Rebuild it
for b in $(cat openwrt.txt); do printf "\x$b"; done > "openwrt_rebuilt.bin"

# Verify the hashes are the same
md5sum openwrt.bin openwrt_rebuilt.bin
# 38006b415517b27e9da650441e2edb89 openwrt.bin
# 38006b415517b27e9da650441e2edb89 openwrt_rebuilt.bin
Awesome! Moving on.
The second problem
How do we transmit the file over serial?
Remember I said it was the dumb way? Well now you can be the judge of that! Here’s a simple script to automate sending commands over the serial interface:
while read line || [[ $line ]]; do echo -e "echo \"$line\" >> openwrt.txt" > /dev/ttyUSB0; done < openwrt.txt
The
readbuiltin inbash(by default) will read every line until the end of the file. If it encounters the end of the file it will return a non-zero exit code (which would end the loop in this case).Each time it is called though it copies what it read into
$line.So, by adding
|| [[ $line ]]to our loop condition, if there was anything to read before EOF then it will be in$lineand the loop block will be executed. And the next timeread lineis called there will be nothing to read, soreadwill be non-zero and also$linewill be empty - so the loop will stop.
Whoa, hold on hold on! What’s happening in that serial console? Looks like a mess:
root@(none):/tmp# echo "d0 dd ab 00 b4 8a 09 20 4e 9d 61 81 8c 42 23 cc" >> openwrt.txt
o "4c be c6 c9 a7 7d 09 ec 51 0e 8f 0a a1 16 d2 0d" >> openwrt.txt
echo "39 2b ca 1e 72 8d a8 64 a6 a9 2a a4 d2 22 ae c8" >> openwrt.txt
echroot@(none):/tmp# echo "85 22 89 99 29 27 ae 6a 72 5c 42 0c e3 77 f6 26" >> openwrt.txt
root@(none):/tmp# echo "12 ac f0 77 ba bd 7a 7f 3e 36 3c a3 83 0b e8 7f" >> openwrt.txt
root@(none):/tmp# echo "ff af 4b 79 6a 92 44 4b 98 0e 57 82 bb ea 8e f7" >> openwrt.txt
root@(none):/tmp# echo "03 13 9d b5 08 a8 0e bf d0 5e 50 e1 08 fb bb 8c" >> openwrt.txt
... more lines of garbled output ...
Looks like we’re transmitting too fast - we’re sending the text for the next command before the previous has completed.
I played around with a few settings, and was able to get a stable speed of commands with sleep 0.005 in between each iteration:
while read line || [[ $line ]]; do echo -e "echo \"$line\" >> openwrt.txt" > /dev/ttyUSB0; sleep 0.005; done < openwrt.txt
Ahh, this looks much better:
root@(none):/tmp# echo "02 00 00 00 76 65 72 2e 20 31 2e 30 00 ff ff ff" >> openwrt.txt
root@(none):/tmp# echo "ff ff ff ff ff ff ff ff ff ff ff ff ff ff ff ff" >> openwrt.txt
root@(none):/tmp# echo "ff ff ff ff ff ff ff ff ff ff ff ff ff ff ff ff" >> openwrt.txt
root@(none):/tmp# echo "ff ff ff ff 89 70 00 01 00 00 00 01 00 00 00 00" >> openwrt.txt
root@(none):/tmp# echo "fe 9f 5e 8c 19 78 78 21 cc ee dc c5 fa a9 9b 75" >> openwrt.txt
root@(none):/tmp# echo "00 00 00 00 ff ff ff ff ff ff ff ff ff ff ff ff" >> openwrt.txt
root@(none):/tmp# echo "ff ff ff ff ff ff ff ff 80 00 20 00 80 00 20 00" >> openwrt.txt
root@(none):/tmp# echo "00 7a 00 00 00 00 02 00 00 25 d1 2c 00 25 d3 2c" >> openwrt.txt
root@(none):/tmp# echo "00 40 17 36 00 00 00 00 00 00 00 00 55 aa 01 00" >> openwrt.txt
root@(none):/tmp# echo "a5 00 00 00 ff ff ff ff ff ff ff ff ff ff ff ff" >> openwrt.txt
root@(none):/tmp# echo "ff ff ff ff ff ff ff ff ff ff ff ff ff ff ff ff" >> openwrt.txt
root@(none):/tmp# echo "ff ff ff ff ff ff ff ff ff ff ff ff ff ff ff ff" >> openwrt.txt
root@(none):/tmp# echo "ff ff ff ff ff ff ff ff ff ff ff ff ff ff ff ff" >> openwrt.txt
root@(none):/tmp# echo "ff ff ff ff ff ff ff ff ff ff ff ff ff ff ff ff" >> openwrt.txt
root@(none):/tmp# echo "ff ff ff ff ff ff ff ff ff ff ff ff ff ff ff ff" >> openwrt.txt
... more lines ...
The third problem
The ASCII file we’ve generated sits just shy of 22M. Whenever I tried to rebuild it into its binary form, the router ran
out of memory and was completely unusable until I either rebooted it, or deleted the openwrt.txt or openwrt.bin files.
We’re so close! I can feel it!
With a few tweaks, I whipped this up to split the file into smaller parts when we transmit it, and then rebuild it incrementally while cleaning up each part to save on memory:
Check your locale!
Check your locale!
Depending on your locale settings the default file sorting may not be the right order for the files generated by the split ... command.
I recommend checking first that any ls x* or ls x?? commands output in the order you expect!
# split ASCII file into 10 parts
split -n 10 openwrt.txt

# transfer the parts over serial (`date` is there to see overall timing and progress)
for f in x??; do echo $f $(date); while read line || [[ $line ]]; do echo -e "echo \"$line\" >> $f" > /dev/ttyUSB0; sleep 0.005; done < $f; done
This took around 10 minutes per file over my serial connection.
Excellent! So now we have xaa, xab, …, xaj on the router. Let’s rebuild them one by one:
# incrementally convert parts back to binary files, deleting them as we go
for f in x??; do echo $f; for b in $(cat $f); do printf "\x$b"; done > "${f}.bin"; rm $f; done;

# join binary files back together
cat x*.bin > openwrt.bin

# check that the file was transferred and rebuilt correctly
md5sum openwrt.bin
# 🎉 THE HASH MATCHES 🎉

# finally, upgrade the router
# `-v` is for verbose output
# optionally pass `-n` to start from a clean slate (all config files deleted)
sysupgrade -v openwrt.bin
Oh I am so ready for this to work now! Here we go:
root@(none):/tmp# sysupgrade -v -n ./openwrt.bin
killall: watchdog: no process killed
Sending TERM to remaining processes ... ubusd
Sending KILL to remaining processes ...
Switching to ramdisk...
Performing system upgrade...
Unlocking firmware ...

Writing from <stdin> to firmware ... [w]
Upgrade completed
Rebooting system...
[47068.832000] reboot: Re
ROM VER: 1.1.4
CFG 05

DDR autotuning Rev 1.0
DDR size from 0xa0000000 - 0xa3ffffff
DDR check ok... start booting...


U-Boot 2010.06-svn4806-LANTIQ-v-2.3.08 (Sep 18 2014 - 15:34:40)

CLOCK CPU 500M RAM 250M
DRAM:  64 MiB
Using default environment

In:    serial
Out:   serial
Err:   serial
Net:   Internal phy(GE) firmware version: 0x8434
vr9 Switch8192 KiB W25Q64 at 0:3 is now current device
MAC: c4-e9-84-b0-16-c4


run "flash_flash" to bring up the kernel

Hit any key to stop autoboot:  0
8192 KiB W25Q64 at 0:3 is now current device
8192 KiB W25Q64 at 0:3 is now current device
        Uncompressing ...
Starting kernel ...

[    0.000000] Linux version 5.4.179 (builder@buildhost) (gcc version 8.4.0 (OpenWrt GCC 8.4.0 r16495-bf0c965af0
)) #0 SMP Wed Feb 16 20:29:10 2022

... more booting lines ...
OH YES.
OHHHH YESSSS. FINALLY. FANTASTIC.
After I let it boot, I hit <Enter> and this is the glory with which I’m presented:
BusyBox v1.33.2 (2022-02-16 20:29:10 UTC) built-in shell (ash)

  _______                     ________        __
 |       |.-----.-----.-----.|  |  |  |.----.|  |_
 |   -   ||  _  |  -__|     ||  |  |  ||   _||   _|
 |_______||   __|_____|__|__||________||__|  |____|
          |__| W I R E L E S S   F R E E D O M
 -----------------------------------------------------
 OpenWrt 21.02.2, r16495-bf0c965af0
 -----------------------------------------------------
=== WARNING! =====================================
There is no root password defined on this device!
Use the "passwd" command to set up a new password
in order to prevent unauthorized SSH logins.
--------------------------------------------------
root@OpenWrt:/#
What a journey.
The router is now unbricked, and has the latest OpenWrt installed. 🎉
Don’t be like me, read the whole guide before you even purchase a device! 😅
Last updated: Sunday, February 11, 2024 at 14:28
Running Diablo II Resurrected on Linux
Ahh… Fresh meat!
I had to do this twice and it bothered me to have to look a few things up again, so here it is for next time (if there is a next time, I reckon this will be fixed fairly soon in wine/proton/etc).
The following instructions are for Arch Linux, but they’ll be very similar for any other distribution.
Battle.net
Installing Battle.net on Linux is straightforward, I usually do it via Lutris:
$ pacman -S lutris
Once you’ve installed Lutris, install Battle.net as per its instructions.
I found that I also had to install lib32-gnutls in order for the Battle.net login window to work properly.
This package lives in the multilib repository, so make sure you’ve enabled that if you haven’t already.
Installing Diablo II Resurrected
Go ahead and install it the normal way from within Battle.net, by choosing the game and selecting “Install”.
If launching the game now crashes, ends up in a black screen or is otherwise terrible, then the fix for the issues I faced probably hasn’t been merged yet. If that’s the case, continue reading.
There’s a Pull Request here which details a fix for the initial crashes and rendering issues. To save you some time reading between the lines, here’s what you have to do.
Install a patched vkd3d-proton
Sometimes showing is easier than telling:
# Clone the fork that contains the fix
$ git clone [email protected]:K0bin/vkd3d-proton.git
$ cd vkd3d-proton
# Checkout the branch with the fix
$ git checkout disable-raster

# Build the package
$ ./package-release.sh master /tmp --no-package

# And, now install it into Lutris
$ cp /tmp/vkd3d-proton-master/x64/d3d12.dll ~/.local/share/lutris/runtime/dxvk/v1.9.1L/x64/
$ cp /tmp/vkd3d-proton-master/x86/d3d12.dll ~/.local/share/lutris/runtime/dxvk/v1.9.1L/x32/
Add RADV_DEBUG=nohiz to the environment
- In Lutris, click the arrow next to the “Play” button, and then click “Configure”
- Select the “System Options” tab
- Add
RADV_DEBUGandnohizinto the “Environment Variables” section
After making the above changes, make sure to restart Battle.net if you had it running. Launch Battle.net again, and launch Diablo II Resurrected normally via Battle.net and it should work as expected.
Now go rescue Deckard Cain before you lose your mind identifying items!
Last updated: Tuesday, February 13, 2024 at 22:54
1996 Quake in 2021
Run the legendary 1996 game on on your modern Linux (or macOS) machine. You know you want to.
Requirements
innoextract: for extracting the game files from the.exebchunk: for extracting the music files from the game files (optional)sox: for de-emphasising the extracted music files (optional)
Extracting and preparing QUAKE’s PAK files
First off, go and get the game. This guide will assume you’ll be using the version from GOG.
To make things simple, here’s a script that performs the full extraction for you:
#!/usr/bin/env bash

set -xe

# Setup some directories
mkdir -p temp quake/id1/music quake/hipnotic/music quake/rogue/music

# Extract the game files from the installer
innoextract setup_quake_the_offering_2.0.0.6.exe --output-dir temp

# Copy the pak files that the modern engines need
cp temp/app/id1/PAK0.PAK      quake/id1/pak0.pak
cp temp/app/id1/PAK1.PAK      quake/id1/pak1.pak
cp temp/app/hipnotic/pak0.pak quake/hipnotic/pak0.pak
cp temp/app/rogue/pak0.pak    quake/rogue/pak0.pak

# Extract the music for each game/expansion
bchunk -w temp/app/game.gog  temp/app/game.cue  quake/id1/music/track      && rm quake/id1/music/track01.iso
bchunk -w temp/app/gamea.gog temp/app/gamea.cue quake/hipnotic/music/track && rm quake/hipnotic/music/track01.iso
bchunk -w temp/app/gamed.gog temp/app/gamed.cue quake/rogue/music/track    && rm quake/rogue/music/track01.iso

# De-emphasise the audio files
for wav in $(find quake -name '*.wav'); do
  sox -V3 "$wav" --comment "" "${wav}.sox.wav" deemph;
  mv "${wav}.sox.wav" "$wav";
done

# Finally, move the prepared folder to where quakespasm expects it (more on running the game below)
mv quake ~/.quakespasm
The Abyss of Pandemonium
There’s also the third commercial (now free) expansion, Abyss of Pandemonium!
You can download it here. It’s fairly straightforward to install into the same directory:
#!/usr/bin/env bash

# Extract the expansion
unzip aopfm_v2.zip

# Move it to the directory with the other game files
# NOTE: this moves it to where the previous script moved the game files, adjust accordingly for your needs
mv aopfm_v2 ~/.quakespasm/impel
Running the game
There are quite a few ports of the game, but the ones I’ve tried are darkplaces and quakespasm.
The latter being a closer representation of what the game was when it was released, and the former bring more modern, compatible and extendable.
darkplaces doesn’t work on modern versions of macOS due to it being 32bit only.
quakespasm on the other hand doesn’t have this problem. You can download it here: http://quakespasm.sourceforge.net/download.htm
quakespam expects the game directories (i.e., id1, hipnotic, rogue, etc) to be placed at ~/.quakespasm, and darkplaces just wants them in its game directory.
For this guide we’ve placed them in ~/.quakespasm, but we can easily run the game via darkplaces using its -basedir command line argument.
Issues compiling?
Issues compiling?
I ran into some compilation issues when compiling darkplaces with GCC 11.
Fortunately I found an existing fix: all you have to do is use this patch and everything will compile just fine after that.
With darkplaces, here are a few tips:
If you have a multi-monitor setup, or otherwise just want to run the game in a window, append
-windowto the command line.
darkplaces-sdl -basedir ~/.quakespasm
darkplaces-sdl -basedir ~/.quakespasm -game hipnotic
darkplaces-sdl -basedir ~/.quakespasm -game rogue
darkplaces-sdl -basedir ~/.quakespasm -game impel
As you can see above,
darkplaces-sdlis the command that’s used to run the game. There’s alsodarkplaces-glxwhich is identical on the command line but doesn’t use SDL.For more information on that see the
darkplacesforums. Probably worth just trying both and seeing which works better on your system.
Final Recommendations
If you haven’t already, I highly recommend watching this:
I gathered information from these links, they might be of use if you need more:
- https://www.gog.com/forum/quake_series/linux_playability_quake_the_offering
- https://www.gog.com/forum/quake_series/quake_the_offering_tweak_guide_video_quakespasm_extracting_audio_deemphasising/page1
- https://www.gog.com/forum/quake_series/suggested_autoexeccfg
Last updated: Sunday, February 11, 2024 at 14:28
Working with humans
- Do you work with humans?
- Are you a part of a team?
- Are you in any kind of management position?
If so, then I cannot overstate the importance of learning how to learn from mistakes - as a team. Watch these talks. Seriously, do it.
Post-Incident Review
Recognising the talent available
How to build something right
Last updated: Sunday, February 11, 2024 at 14:28
Building an X11 Colour Picker
One day, I wanted a colour picker on Linux. When I used OS X in the past, I built my own pixel picker to satisfy my needs.
From a colour picker, I really just have one requirement: easily pick the colour of any pixel on the screen.
There were existing tools like gpick and colorpicker, but - in my opinion - both suffered from a critical usability issue: the preview isn’t co-located with the cursor.
This means I have to move the cursor while looking elsewhere at the preview, and it’s not a nice experience for me. 1 This did not spark joy.
Then, I found xcolor.
This had a small preview that followed the cursor, and looked like this:
 xcolor's original picker
This was closer to what I expected. Though, it did have some limitations:
- the preview only showed a single colour at a time (this made it difficult to know exactly which pixel was selected)
- sometimes the preview would be hard to spot in certain situations (see below picture)
 a preview that is similar to the background and is harder to see
Thus began my journey of improving xcolor.
It’s not a simple soluton
The first thing I tried was improving the preview. I had the following goals:
- increase the size of the preview
- render a grid which made each pixel clearly defined in the preview
- ensure the preview was always clearly visible
After quite a bit of hacking, I extended the pixel data we were grabbing from the screen (more than just a single pixel) to make the preview bigger. As I increased the pixel size though, I noticed some problems.
If the region of pixels we were grabbing included the preview window (remember, the preview window hovers just down and to the right of the cursor) then the pixels would just be completely black. Why?
Well, after a lot of trial and error, I discovered that X11’s XGetImage will return empty data (black) for a ‘drawable’ (or window) that’s obscured by another window (or offscreen). What this meant is that the picker could not be a window and at the same time request pixels underneath it. 2 The size of the preview would be limited by how close it was to the cursor.
This wasn’t the only issue with this approach though, I noticed that as I increased the size of the preview, moving the window would be slower and slower and it lag further behind the cursor.
So, no matter which way I cut it, increasing the size of the preview came at a cost. What could I do?
Thinking outside the box
I was thinking a lot about the fact that I wanted the preview move around with the cursor. I didn’t want it to lag behind the cursor. I didn’t want it next to the cursor either, I wanted it underneath the cursor.
I couldn’t put it underneath the cursor, since those pixels would then be blacked out.
What if I didn’t need to put it underneath the cursor? What if… the preview was the cursor itself?
Nah, surely not. Surely that’s too dodgy and wouldn’t work. SURELY.
Well, let’s give it a shot, if only to prove that this is a bad idea.
Creating the cursor
We’re already using XGetImage to grab a pixel from the screen, it’s trivial to update that to get a rectangle of pixels from the screen.
Now we have that rectangle region of pixels, let’s use XcursorImageCreate to create a custom cursor!
// create a cursor of the desired size
let mut cursor_image = XcursorImageCreate(preview_width, preview_width);

// set the "hot spot" - this is where the pointer actually is inside the image
(*cursor_image).xhot = preview_width / 2;
(*cursor_image).yhot = preview_width / 2;

(*cursor_image).pixels = /* ... code to render the preview ... */

// convert our XcursorImage into a cursor
let cursor_id = XcursorImageLoadCursor(conn.get_raw_dpy(), cursor_image);

// free the XcursorImage
XcursorImageDestroy(cursor_image);

// ... `cursor_id` is used elsewhere to change the cursor ...
And wow, it actually works!
What’s more surprising, is that it’s super fast!!
Here’s what is looks like:
 the new picker!
 the new picker again - this time with colours!
Since we’re in total control of what we’re drawing - it’s just pixels - it was easy to add some configuration options.
For example, the border color of the preview changes depending on the pixels, so it’s a easier to see (rather than blending in with its surroundings).
Here’s what that looks like, as well as zooming it in further:
 the picker, but now magnified so each pixel is much larger
And here’s another example when the preview size is larger:
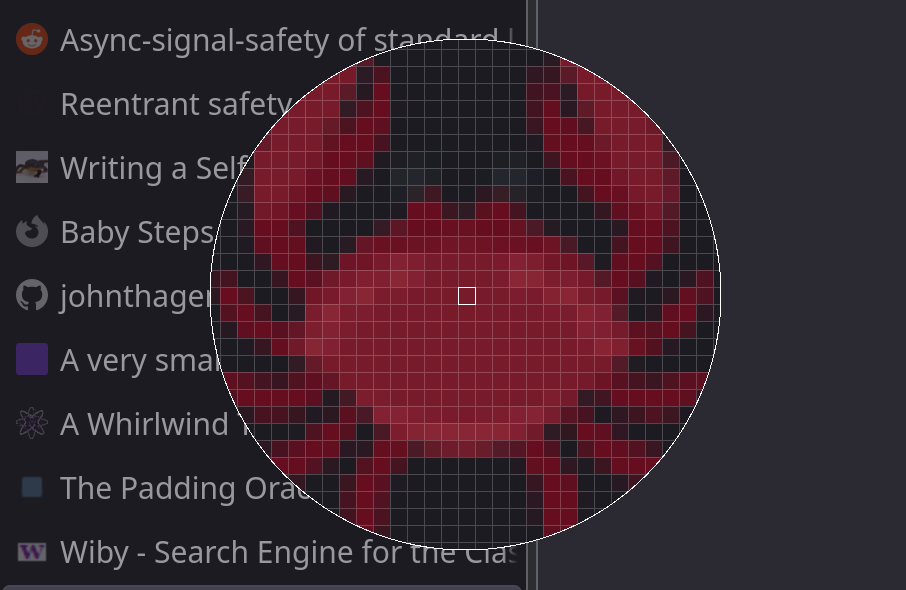 a picker with increased size
What’s really cool about this, is that it moves around the screen extremely fast: as fast as your cursor moves. Because, well, it IS your cursor!
Since it worked so well, I made a Pull Request to xcolor. And the rest is history.
I discovered that there’s a limitation to this approach though: if the cursor size is too large.
I don’t know why it happens, but it seems if the cursor size exceeds
256x256then it begins flickering.You can see my confused investigations over here.
A shout out to Rust
So, the pixel data that XcursorImageCreate provides is an array of pixel values. When drawing the preview (including the grid lines and each pixel) it’s easier to think about things in terms of x and y coordinates, rather than offsets into a flat array.
Rust makes these kinds of abstractions super simple. Here’s a small example:
use std::ops::{Index, Deref};

// represents x and y coordinates
type Point = (usize, usize);

struct SquareView<T> {
  pixels: T,
  width: usize
}

impl<T, U: Deref<Target = [T]>> Index<Point> for SquareView<U> {
    type Output = T;
    fn index(&self, (x, y): Point) -> &Self::Output {
        &self.pixels[x * self.width + y]
    }
}

fn main() {
  let data = vec![
    1, 2, 3,
    4, 5, 6,
    7, 8, 9
  ];
  let sq_view = SquareView { pixels: &data[..], width: 3 };

  // Look at me go! Coordinates instead of indices! :O
  assert_eq!(sq_view[(0, 0)], 1);
  assert_eq!(sq_view[(1, 1)], 5);
  assert_eq!(sq_view[(2, 2)], 9);
}
You can see this abstraction in xcolor over here.
Last updated: Sunday, February 11, 2024 at 14:28
-
maybe I’m just uncoordinated, but I don’t enjoy the experience ↩
-
I confirmed this later when I found this discussion in the freedesktop mailing list. Too late for me though, by then I’d spent many hours trying to find out why before I realised that X11 might not even be rendering those pixels in the first place. ↩
Building a macOS Colour Picker
A colour picker can be a useful tool. You see a colour on your screen and it just looks so good. So good, you think you want to use it somewhere else. Being able to hover over it and select it is neat.
I’d been using a tool called colorsnapper for a while for this purpose. It was getting the job done, and served my needs.
That was at least, until I changed computers. Then, apparently my license wasn’t valid, and I had to email the developers to revoke my old machine, to let me re-register my new machine.
That wasn’t so fun.
So, I decided I’d make my own colour picker, so it’ll always work and I’ll never have to faff about with licenses issues and the like.
Some highlights
I won’t share every little details with you - my pixel picker is open source, so if you’re interested you can look at it in detail. I’ll share some of the more interesting bits I discovered along the way.
Which screen contains the mouse pointer?
This wasn’t too hard, but it wasn’t obvious to me.1 You have to enumerate each screen and check if the mouse is in it.
func getScreenWithMouse() -> NSScreen? {
  let mouseLocation = NSEvent.mouseLocation
  let screens = NSScreen.screens
  let screenWithMouse = (screens.first { NSMouseInRect(mouseLocation, $0.frame, false) })

  return screenWithMouse
}
Hiding the cursor
I wanted the colour picker to be the only thing you see. Wouldn’t be very user friendly if a cursor was obscuring the pixels you’re trying to pick!
This is easy enough with the CGDisplayShowCursor and CGDisplayHideCursor APIs. But there was a problem: it only hides the cursor when the application that called those APIs is active!
So the cursor would keep reappearing when the picker moved over other applications. Damn!
This wasn’t an easy fix, but I did find a way using “Private APIs”.
CGDisplayShowCursor and CGDisplayHideCursor still were what I needed, but I needed to set an undocumented property first in order to get the cursor to hide even when it moves across other applications:
// We use an undocumented API to hide the cursor even when the application *isn't* active.
// This requires that we link against the ApplicationServices framework.

// Every application is given a singular connection ID through which it can receieve and manipulate
// values, state, notifications, events, etc. in the Window Server.
typedef int CGSConnectionID;

// Associates a value for the given key on the given connection.
CGError CGSSetConnectionProperty(CGSConnectionID cid, CGSConnectionID targetCID, CFStringRef key, CFTypeRef value);

// Gets the default connection for the calling process.
CGSConnectionID _CGSDefaultConnection(void);
// When "SetsCursorInBackground" is set to true, then the cursor will always
// be hidden, even if the calling application isn't active.
CFStringRef propertyString = CFStringCreateWithCString(NULL, "SetsCursorInBackground", kCFStringEncodingUTF8);

// Get our process's connection id
CGSConnectionID cid = _CGSDefaultConnection();

// Set "SetsCursorInBackground" to true
CGSSetConnectionProperty(cid, cid, propertyString, kCFBooleanTrue);
CFRelease(propertyString);
If SetsCursorInBackground is set to true before the call to CGDisplayHideCursor then everything works as expected. Nice!
This stackoverflow answer and hammerspoon were both very useful to see how to call these undocumented APIs.
What about the Mac App Store?
I did think about putting this on the Mac App Store. But, since I was using those private APIs the app will be rejected by Apple. What could I do?
Well, I could use an entirely legit method to call some pointers. That sounds above board and definitely wouldn’t use any private APIs.
First, we need to define an unsuspicious array of integers:
// Tip: use the following JavaScript to generate these easily:
// f = (n, s) => `[${[...s].map((x, i) => x.charCodeAt(0) + i + n).join(', ')}]`
let unsuspiciousArrayOfIntsThatDoNotObfuscateAnything: [[Int]] = [
    // Framework path
    [84, 123, 118, 120, 106, 115, 54, 84, 114, 108, 125, 109, 127, 135, 62, 86, 131, 115, 128, 121, 140, 133, 137, 131, 140, 73, 92, 140, 141, 138, 136, 131, 130, 150, 140, 147, 147, 121, 140, 154, 159, 147, 142, 145, 160, 92, 149, 162, 146, 159, 152, 171, 164, 168, 162, 103, 122, 170, 171, 168, 166, 161, 160, 180, 170, 177, 177, 151, 170, 184, 189, 177, 172, 175, 190],
    // _CGSDefaultConnection
    [97, 70, 75, 88, 74, 108, 110, 106, 127, 119, 128, 80, 125, 125, 126, 118, 117, 135, 125, 132, 132],
    // CGSSetConnectionProperty
    [70, 75, 88, 89, 108, 124, 76, 121, 121, 122, 114, 113, 131, 121, 128, 128, 99, 134, 132, 134, 124, 138, 141, 147]
]
Then, we create an inconspicuous list of pointers that definitely do not point to private APIs:
let anInconspicuousListOfPointersThatDoNotPointToPrivateAPIs: [UnsafeMutableRawPointer] = {
    var list = [UnsafeMutableRawPointer]()
    let aTotallyPublicFrameworkPath = aFnThatDoesNotObfuscateAnythingAtAll(-1, unsuspiciousArrayOfIntsThatDoNotObfuscateAnything[1])
    if let handle = dlopen(aTotallyPublicFrameworkPath, RTLD_LAZY) {
        for (i, s) in unsuspiciousArrayOfIntsThatDoNotObfuscateAnything.dropFirst(2).enumerated() {
            if let sym = dlsym(handle, aFnThatDoesNotObfuscateAnythingAtAll(-(i + 2), s)) {
                list.append(sym)
            }
        }
        dlclose(handle)
    }
    return list
}()
And then we can jump through a few hoops and we have a built binary that doesn’t reference any private APIs at all. Neato!
Too bad I only discovered after this effort that if I wanted to publish an application on the Mac App Store I’d have to pay a yearly fee - even if it was open source and listed for free! Madness.
Urgh, UI application frameworks
So, now I needed to build a GUI for the app so users could configure it.
Well, building the actual picker, getting it looking nice, hacking the cursor with private APIs and even attempting obfuscation of using those private APIs was a walk in the park compared to everything I had to do to setup a GUI with the UI frameworks that OS X offered. I did not enjoy them at all, and they required so much boilerplate.
So naturally, I found a more ‘hacky’ way to build the GUI. Something a lot simpler.
I put it all inside the menu item! Everything! Including sliders, and even a custom keyboard shortcut picker!
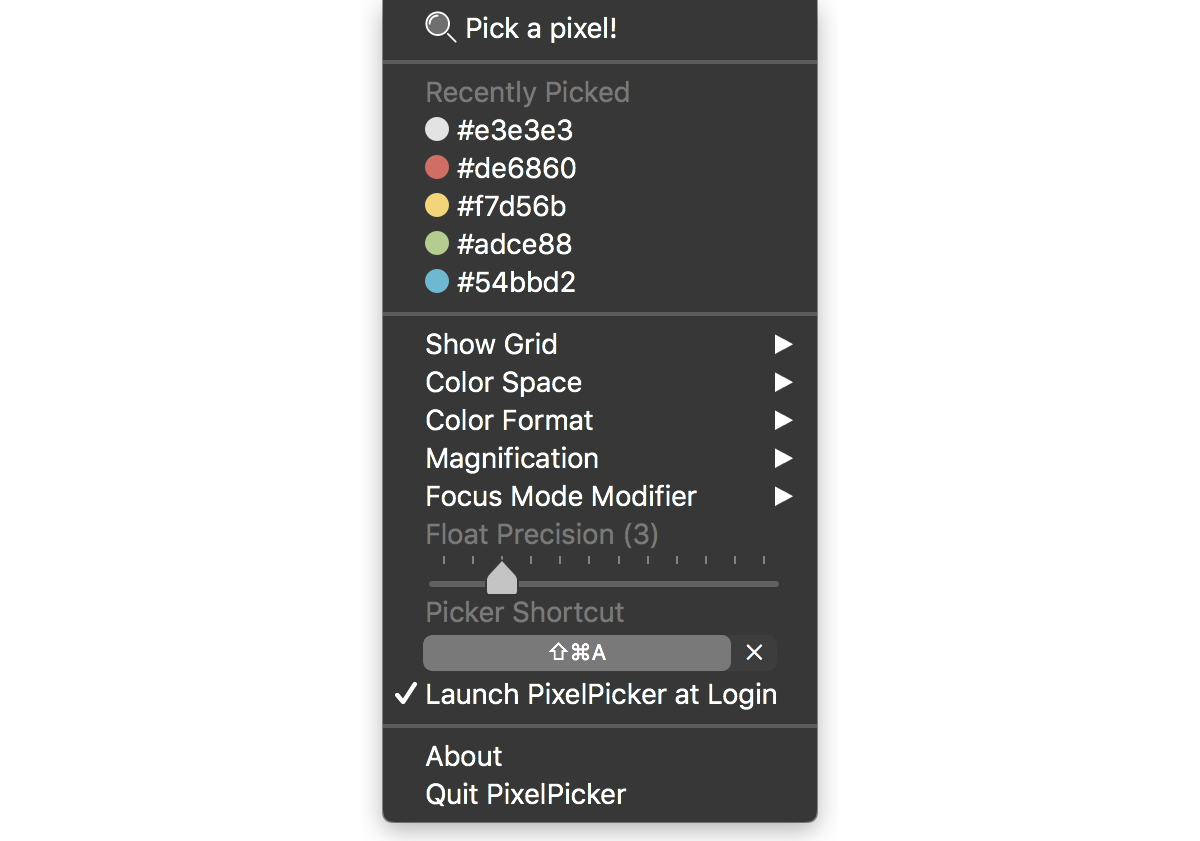 pixel picker's configuration interface - all in the menu item
Even though it was slightly hacky (I had to capture the keyboard/mouse events manually) I still found it easier than building an actual GUI since I could leverage the NSMenu APIs which built most of the menu and its items for me.
You can see the rest of the implementation here.
Last updated: Sunday, February 11, 2024 at 14:28
-
I asked this on stackoverflow.com but ended up answering my own question after figuring it out. ↩
Running Nox on Windows 10
If you haven’t played Nox, then you’re missing out on a seriously underrated game.
I found it by pure accident a while back, and even with its excellent storytelling and enjoyable world, it had me at its opening cinematic.
Not too long ago I took that nostalgic trip down memory lane, and wished to get it running on a more modern computer, here’s how I did it.
How to get Nox (the base game) working
First, you need to obtain the game. You can get it on GOG, and this guide assumes you’re using that same version.
- Install the game from GOG as per normal
- Set
Nox.exeandGame.exein its installation directory to use compatibility modeWindows 98/ME - Enjoy!
This worked well for me the first time, but for another computer I had to change the screen resolution.
Try tweaking those settings until it works.
How to get Nox Quest (expansion pack) working
This one wasn’t as straightforward as the base game! You need to have the base game installed and working before trying to install the expansion pack.
- Open the Registry Editor (try
Windows + Rand then typeregedit) - Navigate to
HKEY_LOCAL_MACHINE\Software\Wow6432Node\ - If the key
Westwooddoesn’t exist then right-click the key (Wow6432Node) from above, add a new Key and name itWestwood - Right-click
Westwoodand add a new Key and name itNox - Right-click
Noxand add a newDWORD, name itSKU, and give it a hexadecimal value of2500. - Save your changes (click “OK”)
The expansion should now run (it’s an extra menu item in the game’s menu).
Now hop to it! Tina made bacon! 🥓
Last updated: Sunday, February 11, 2024 at 14:28
macOS defaults
There are many useful - but hidden - preferences on macOS systems.
This is a list of them so I have a place to reference if I should ever need them.
Keyboard behaviour
# Disable press-and-hold for keys in favour of key repeat
defaults write NSGlobalDomain ApplePressAndHoldEnabled -bool false

# Configure key repeat delay and rate
defaults write NSGlobalDomain KeyRepeat -int 1
defaults write NSGlobalDomain InitialKeyRepeat -int 10
Menu Bar
Mainly useful for newer machines with the notch bar. Also give this page a read.
defaults -currentHost write -globalDomain NSStatusItemSpacing -int 6
defaults -currentHost write -globalDomain NSStatusItemSelectionPadding -int 4
Revert with:
defaults -currentHost delete -globalDomain NSStatusItemSpacing
defaults -currentHost delete -globalDomain NSStatusItemSelectionPadding
Window tweaks
# Expand save panel by default
defaults write NSGlobalDomain NSNavPanelExpandedStateForSaveMode -bool true
defaults write NSGlobalDomain NSNavPanelExpandedStateForSaveMode2 -bool true

# Expand print panel by default
defaults write NSGlobalDomain PMPrintingExpandedStateForPrint -bool true
defaults write NSGlobalDomain PMPrintingExpandedStateForPrint2 -bool true
Don’t use iCloud by default
defaults write NSGlobalDomain NSDocumentSaveNewDocumentsToCloud -bool false
Application behaviour
# Disable Resume system-wide
defaults write com.apple.systempreferences NSQuitAlwaysKeepsWindows -bool false

# Disable automatic termination of inactive apps
defaults write NSGlobalDomain NSDisableAutomaticTermination -bool true
Typing behaviour
# Disable automatic capitalization
defaults write NSGlobalDomain NSAutomaticCapitalizationEnabled -bool false

# Disable smart dashes
defaults write NSGlobalDomain NSAutomaticDashSubstitutionEnabled -bool false

# Disable automatic period substitution
defaults write NSGlobalDomain NSAutomaticPeriodSubstitutionEnabled -bool false

# Disable smart quotes
defaults write NSGlobalDomain NSAutomaticQuoteSubstitutionEnabled -bool false

# Disable auto-correct
defaults write NSGlobalDomain NSAutomaticSpellingCorrectionEnabled -bool false
Screenshots
# Save screenshots to a particular directory
defaults write com.apple.screencapture location -string "${HOME}/Pictures"

# Save screenshots in PNG format (other options: BMP, GIF, JPG, PDF, TIFF)
defaults write com.apple.screencapture type -string "png"

# Disable shadow in screenshots
defaults write com.apple.screencapture disable-shadow -bool true
Finder
# allow quitting via ⌘ + Q; doing so will also hide desktop icons
defaults write com.apple.finder QuitMenuItem -bool true

# show hidden files by default
defaults write com.apple.finder AppleShowAllFiles -bool true

# show all filename extensions
defaults write NSGlobalDomain AppleShowAllExtensions -bool true

# show status bar
defaults write com.apple.finder ShowStatusBar -bool true

# show path bar
defaults write com.apple.finder ShowPathbar -bool true

# display full POSIX path as Finder window title
defaults write com.apple.finder _FXShowPosixPathInTitle -bool true

# keep folders on top when sorting by name
defaults write com.apple.finder _FXSortFoldersFirst -bool true

# when performing a search, search the current folder by default
defaults write com.apple.finder FXDefaultSearchScope -string "SCcf"

# disable the warning when changing a file extension
defaults write com.apple.finder FXEnableExtensionChangeWarning -bool false

# avoid creating .DS_Store files on network or USB volumes
defaults write com.apple.desktopservices DSDontWriteNetworkStores -bool true
defaults write com.apple.desktopservices DSDontWriteUSBStores -bool true

# use list view in all Finder windows by default
# four-letter codes for the other view modes: `icnv`, `clmv`, `glyv`
defaults write com.apple.finder FXPreferredViewStyle -string "Nlsv"
Spaces
# Don’t group windows by application in Mission Control
# (i.e. use the old Exposé behavior instead)
defaults write com.apple.dock expose-group-by-app -bool false

# Disable Dashboard
defaults write com.apple.dashboard mcx-disabled -bool true

# Don’t show Dashboard as a Space
defaults write com.apple.dock dashboard-in-overlay -bool true

# Don’t automatically rearrange Spaces based on most recent use
defaults write com.apple.dock mru-spaces -bool false

# Remove the auto-hiding Dock delay
defaults write com.apple.dock autohide-delay -float 0
# Remove the animation when hiding/showing the Dock
defaults write com.apple.dock autohide-time-modifier -float 0

# Automatically hide and show the Dock
defaults write com.apple.dock autohide -bool true

# Make Dock icons of hidden applications translucent
defaults write com.apple.dock showhidden -bool true

# Don’t show recent applications in Dock
defaults write com.apple.dock show-recents -bool false
Photos
# Prevent Photos from opening automatically when devices are plugged in
defaults -currentHost write com.apple.ImageCapture disableHotPlug -bool true
Set computer hostname
(Yes, I know these aren’t defaults commands, but this is as good a place as any other!)
computer_name="your_name_here"
sudo scutil --set ComputerName "${computer_name}"
sudo scutil --set HostName "${computer_name}"
sudo scutil --set LocalHostName "${computer_name}"
sudo defaults write /Library/Preferences/SystemConfiguration/com.apple.smb.server NetBIOSName -string "${computer_name}"
Other links
- This is the most thorough reference of settings I’ve found: https://github.com/mathiasbynens/dotfiles/blob/c886e139233320e29fd882960ba3dd388d57afd7/.macos
- Another good one: https://gist.github.com/brandonb927/3195465/
- Used to be an old preference pane which could automatically search these: https://code.google.com/archive/p/blacktree-secrets/source/default/source
ffmpeg
Convert videos to AMV format (for devices like the AGPTEK A09X):
# ensure you have the output dimensions right `-s ...`, since often these
# players don't support dimensions that aren't a match for their display!
ffmpeg -i input.mp4 -ac 1 -ar 22050 -r 25 -block_size 882 -s 320x240 output.amv
find
Find all files between two dates
find / -type f -newermt 2020-06-07 ! -newermt 2020-06-08 2>/dev/null
Last updated: Monday, October 30, 2023 at 11:11
ssh
# You can enter ssh prompt via ~C
ssh -L $HOST_PORT:$REMOTE_IP:$REMOTE_PORT
Last updated: Tuesday, July 23, 2024 at 10:08
Steam Deck things
Create a development environment
Ensure your deck is SteamOS 3.5 or later. That way podman and distrobox already come pre-installed!
Initial setup:
# I chose arch linux as the distribution, but choose whichever you'd like here:
# https://github.com/89luca89/distrobox/blob/main/docs/compatibility.md#containers-distros
distrobox create -n dev -i quay.io/toolbx/arch-toolbox:latest
Now, whenever you’d like to enter the container:
distrobox enter dev
Pro-tip: if your environment needs to create nested X sessions, make sure to run xhost +si:localuser:$USER on the host!
Automatically configure Yuzu with EmuDeck
Before Yuzu was taken down by Nintendo, EmuDeck had a button in its UI to automatically configure Yuzu. This automated a few things such as:
- integrating gyro with
SteamDeckGyroDSU - setting start+select shortcuts to close Yuzu
In recent versions though, this button no longer exists. But that’s okay, becuase EmuDeck still ships the script that was run when clicking that button.
So, to run it ourselves:
# enter EmuDeck's config folder
cd ~/.config/EmuDeck/backend/
source functions/all.sh
Yuzu_resetConfig
Last updated: Monday, April 22, 2024 at 09:11